Search

This section gives you the ability to set the post types that will be returned in the search results and also the icon that will be used (default is a magnifying glass).

General

Search Results Post Types
The type of posts to show in the search results
Mark all of the post types that you want to show in the search results.
Icon
Set the icon to be used for the search. This icon is shown next to the menu in many of the Intensity header templates.
Select an Icon Source, then the Icon Type will be populated.

Pages

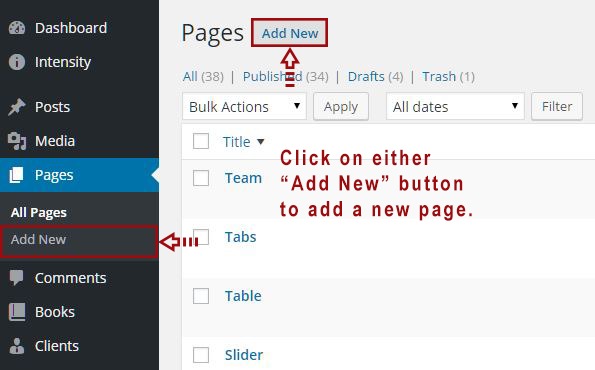
Hover over Pages in the admin sidebar and click the Add New option or navigate to Pages in your admin sidebar and click the Add New option.
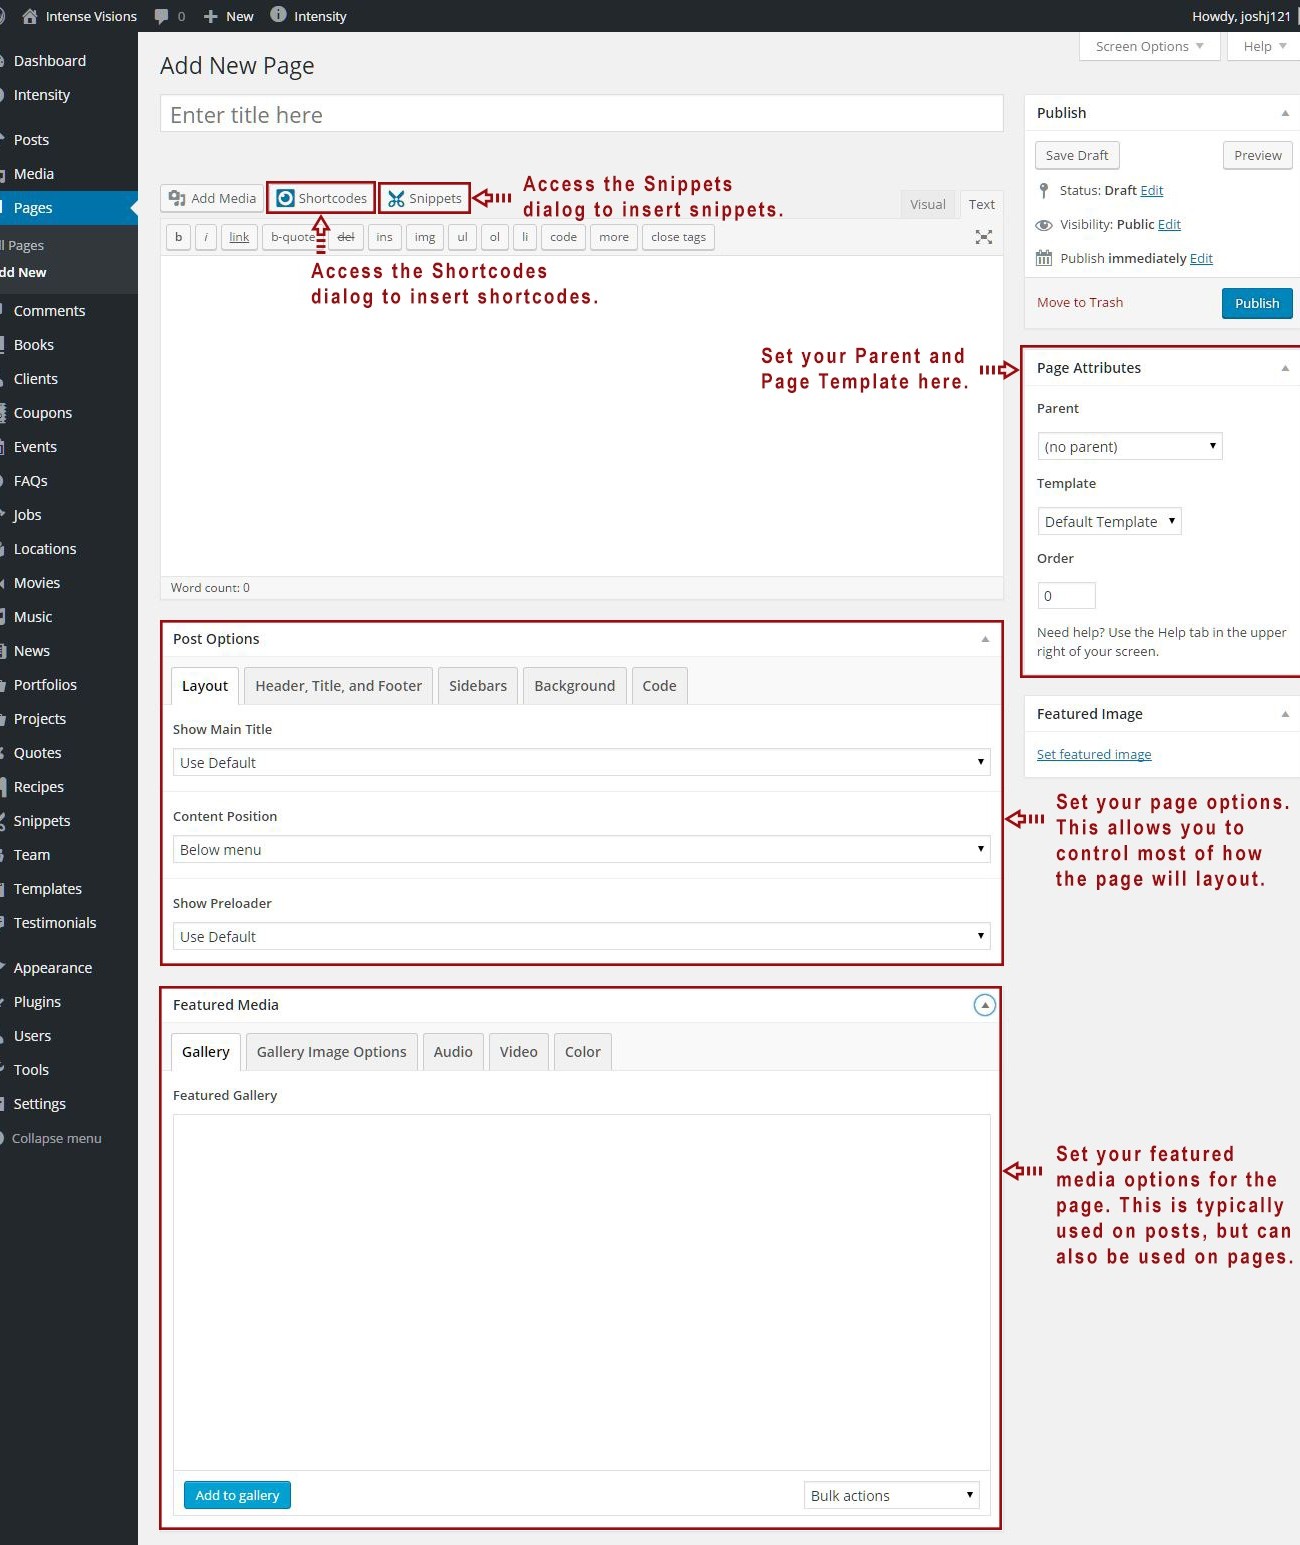
Input a new name for your page, then find the Page Attributes box on right side.
Set your Parent page. It’s usually set to No Parent.
Set your page template from the Template dropdown list. See list of page templates below.
Content for your page goes in the editing field, use the Visual or Text editor. Page content is mainly built using Shortcodes. See the Shortcodes section for how to use them.
Page Sections

Shortcodes – Access the Shortcodes dialog to insert shortcodes.
Snippets – Access the Snippets dialog to insert snippets.
Page Attributes – Set your Parent page and Template. The Parent is usually set to “(no parent)” and the template is normally set to “Default Template”.
Post Options – This section allows you to control much of the layout of your page. Set portions of your page pertaining to layout, header, footer, title bar, sidebars, background, and post/page specific code.
Featured Media – Add a gallery to your page and set the options or add audio or video for the featured item as well. These settings are typically used on Posts, but can also be used on Pages.
Post Options Metabox

The Post Options metabox controls a number of aspects on your page/post. You can control the layout, header, title, footer, sidebars, background, and any post/page specific code.

Header

Header Display Mode
Static - stays at the top of the page and not the viewport. When scrolled, the header may be scrolled out of view.
Fixed - keeps the header fixed to the top of the screen. When scrolled, the header will not move but will remain visible.
Show/Hide - hides the header when scrolling down. Show the header when the user scrolls up.
Shrink - shrinks the header and keeps it visible on the screen as the user scrolls.
Custom - like the show/hide option but you set your own custom CSS classes to apply instead of hiding and showing.
Header Template
Select the template that you want this page to use for the header. If you chose "Use Default", the default template will be used. This "Default Template" can be set in the Intensity theme options.
Secondary Header Template
Select the template that you want this page to use for the secondary header. If you chose "Use Default", the default template will be used. This "Default Template" can be set in the Intensity theme options.
Header Menu
Select the menu that you want this page to use. If you chose "Use Default", the default menu will be used. This "Default" menu can be set in the Intensity theme options.
Secondary Header Menu
Select the secondary header menu that you want this page to use. If you chose "Use Default", the default menu will be used. This "Default" menu can be set in the Intensity theme options.
Header Sidebar 1
Set the Sidebar to be used.
Header Sidebar 2
Set the Sidebar to be used.
Header Sidebar 3
Set the Sidebar to be used.
Header Sidebar 4
Set the Sidebar to be used.
Secondary Header Sidebar 1
Set the Sidebar to be used.
Secondary Header Sidebar 2
Set the Sidebar to be used.
Secondary Header Sidebar 3
Set the Sidebar to be used.
Secondary Header Sidebar 4
Set the Sidebar to be used.

Title

Show Main Title
Select whether you want the main title to show or not. This is the "Title" section, found just below the menu. If you chose "Use Default", this option is set in the Intensity theme options.
Title Template
Select the template that you want this page to use for the title. If you chose "Use Default", the default template will be used. This "Default Template" can be set in the Intensity theme options. The "title" will only be shown if the "Show Main Title" option on the Layout tab is set to "Show" or the default is to show the title.
Title Text
Set the text to be shown in the Title, the default will be to show the page/post title.
Title Sidebar 1
Set the Sidebar to be used.
Title Sidebar 2
Set the Sidebar to be used.
Title Sidebar 3
Set the Sidebar to be used.
Title Sidebar 4
Set the Sidebar to be used.

Body

Content Position
Select whether you want the content of your page to be behind the menu or below the menu. Your options are "Top, behind menu" or "Below menu".
Padding Top
Set this option to add a top padding (measured in pixels) to the main content area.
Padding Bottom
Set this option to add a bottom padding (measured in pixels) to the main content area.

Footer

Footer Template
Select the template that you want this page to use for the footer. If you chose "Use Default", the default template will be used. This "Default Template" can be set in the Intensity theme options.
Show Primary Footer
Select whether you want the primary footer to be shown on the page or not. Your options are "Use Default", "Show", or "Hide".
Show Secondary Footer
Select whether you want the secondary footer to be shown on the page or not. Your options are "Use Default", "Show", or "Hide".
Footer Menu
Select the footer menu that you want this page to use. If you chose "Use Default", the default menu will be used. This "Default" menu can be set in the Intensity theme options.
Footer Sidebar 1
Set the Sidebar to be used.
Footer Sidebar 2
Set the Sidebar to be used.
Footer Sidebar 3
Set the Sidebar to be used.
Footer Sidebar 4
Set the Sidebar to be used.
Secondary Footer Sidebar 1
Set the Sidebar to be used.
Secondary Footer Sidebar 2
Set the Sidebar to be used.
Secondary Footer Sidebar 3
Set the Sidebar to be used.
Secondary Footer Sidebar 4
Set the Sidebar to be used.

Sidebars

Layout
Select the layout for the sidebars that you want the page to use. Your options are "Use Default", "1 Column", "2 Column Left", "2 Column Right", "3 Column Middle", "3 Column Left", "3 Column Right".
Left
Set the sidebar that you want on the left.
Right
Set the sidebar that you want on the right.
Before Content
Set the sidebar that you want to show before the content.
After Content
Set the sidebar that you want to show after the content.

Background

Color
Select the color that you want to be used for the background of the page.
Image
If you want an image as the background of the page, select the image.
Image Mode
If you selected an image as the background, set the image mode for that image here. Your choices are "Full Screen", "Repeat", "Repeat Horizontally", "Repeat Vertically", or "No Repeat".

Comments

Show Comments
Select whether you want the page/post comments to show or not.
Template
Select the template that you want this page to use for the comments.

Extras

Show Preloader
Select whether you want the preloader to show or not during page load. If you chose "Use Default", this option is set in the Intensity theme options.
CSS Code
If you have page specific CSS, it can be placed here. You do not need to include style tags.
Closing </head> Code
Custom code to add before the closing </head> tag. It will be added as-is and should include any necessary script or html tags.
Closing </body> Code
Custom code to add before the closing </body> tag. It will be added as-is and should include any necessary script or html tags.

Featured Media Metabox

The Featured Media metabox allows you to set the featured media to be shown on the page and also how the media is shown.

Gallery

Featured Gallery
Click the "Add to gallery" button to view the media popup. Select the images that you want to be shown in the gallery. Hit the "Select" button once you have the image(s) selected. If you want to remove an image, hover over the image and click the "X".

Gallery Image Options

Image Type
Select the template that you want this page to use for the header. If you chose "Use Default", the default template will be used. This "Default Template" can be set in the Intensity theme options.
Shadow
Select the template that you want this page to use for the title. If you chose "Use Default", the default template will be used. This "Default Template" can be set in the Intensity theme options. The "title" will only be shown if the "Show Main Title" option on the Layout tab is set to "Show" or the default is to show the title.
Hover Effect Type
Select the template that you want this page to use for the footer. If you chose "Use Default", the default template will be used. This "Default Template" can be set in the Intensity theme options.
Subtle Hover Effect
Select whether you want the primary footer to be shown on the page or not. Your options are "Use Default", "Show", or "Hide".
Effeckt Hover Effect
Select whether you want the primary footer to be shown on the page or not. Your options are "Use Default", "Show", or "Hide".
Caman Effect

*Only visible for Image Type of "Caman".

Start Effect

*Only visible for Image Type of "Adipoli".

Hover Effect

*Only visible for Image Type of "Adipoli".

Splits

*Only visible for Image Type of "Picstrip".

Horizontal Gutter

*Only visible for Image Type of "Picstrip".

Vertical Gutter

*Only visible for Image Type of "Picstrip".

Audio

Audio URL
Enter the URL to the audio file.

Video

Type
Select the type of video. Your options are "WordPress", "Blip.tv", "College Humor", "Flickr", "FunnyOrDie.com", "Hulu", "Qik", "Revision3", "Screenr", "Ted", "Viddler", "Vimeo", "WordPress.tv", or "Youtube".
Video Size
Set the size of the video. Your options are "Auto", "Wide (16:9)", "Standard (4:3)", or "Square (1:1)".
Poster Image
Select an image to be used as the Poster Image. This image will displayed prior to the video starting.
MP4 Video
Select an MP4 video from your media library.
*Only visible for Type of "WordPress".
OGV Video
Select an OGV video from your media library.
*Only visible for Type of "WordPress".
WebM Video
Select an WebM video from your media library.
*Only visible for Type of "WordPress".
Video URL
Set the URL to the video.
*Visible for all Types aside from "WordPress".

Color

Color
Set the color that you want to be used in place of media.

Sidebars

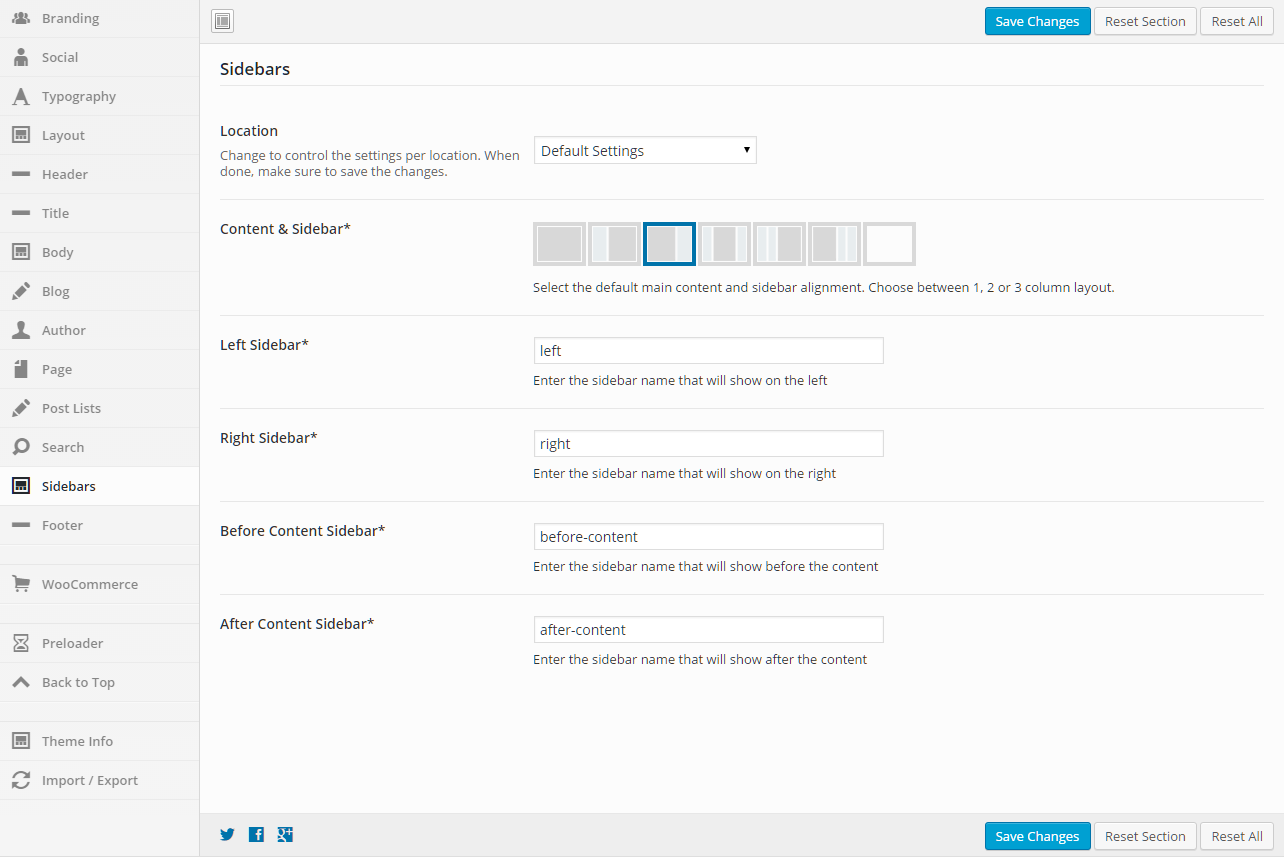
This section gives you the ability to control the sidebars for the post type and post type archive pages. The sidebar settings can be applied to all different post types and their archive pages.

General

Location
Change to control the settings per location. When done, make sure to save the changes. The settings below this dropdown will apply to the location that is chosen.
Content & Sidebar
Select the default main content and sidebar alignment. Choose between 1, 2 or 3 column layout.
Left Sidebar
Enter the sidebar name that will show on the left.
Right Sidebar
Enter the sidebar name that will show on the right.
Before Content Sidebar
Enter the sidebar name that will show before the content.
After Content Sidebar
Enter the sidebar name that will show after the content.

Custom Post Types

Intensity comes with the Intense shortcodes plugin, which includes many custom post types. Each of these custom post types have their own set of metabox options. You can add new posts much the same as you add a new page.

If the custom post type that you are looking for does not show in the WordPress admin menu, the custom post type may not be active. If this is the case, go into the Intense admin options (Settings->Intense), then to the Custom Post Types tab and make sure that the custom post types that you want to be active are properly checked in the “Active Custom Post Types” list and then save the options.

The list of the included Custom Post Types is to the right (or below on mobile devices). If you want to jump to the screenshot and metabox options information for one of the custom post types, simply click on the name.

Books Custom Post Type

This custom post type allows you to display your books or your favorite books. You can add audio for each book and can also link to where to purchase the book(s).

Book Options

Subtitle
This is for the subtitle, if the book has one.
Single Post Template
Select the template that you want the single post page to use. These templates can be modified or you can create your own. Please see Templates to learn more.
Audio URL
Audio file URL. Supported formats are mp3 and ogg.
Cover Image
Select the cover image of the book.
Website
Enter the website of the book.
Purchase Link
This can be used for a link to where to purchase the book (also can be used for affiliate link to purchase book).
Languages
Enter the languages that the book is available in. Click the "Add Language" button, then enter the Language. To add more languages, click the "Add Language" button again.
Excerpt
Excerpt from the book.
Types
Hardcover, Paperback, Audiobook, Audio CD, Kindle, Audible Audio Edition, Printed Access Code, HTML, PDF, Board Book, Audio Cassette
Release Date
Enter the date that the book was released.
Recommended Age
Recommended age for readers. What age group is the book directed towards or best suited for?
Back Cover Text
Enter the description of the book that is shown on the back cover.
Awards
Click the "Add Award" button, then enter the Name and Description of the award. To add more awards, click the "Add Award" button again.
Reviews
Click the "Add Review" button, then enter the Reviewer, Review Date, Rating and the Review of the review. To add more reviews, click the "Add Review" button again.

Clients Custom Post Type

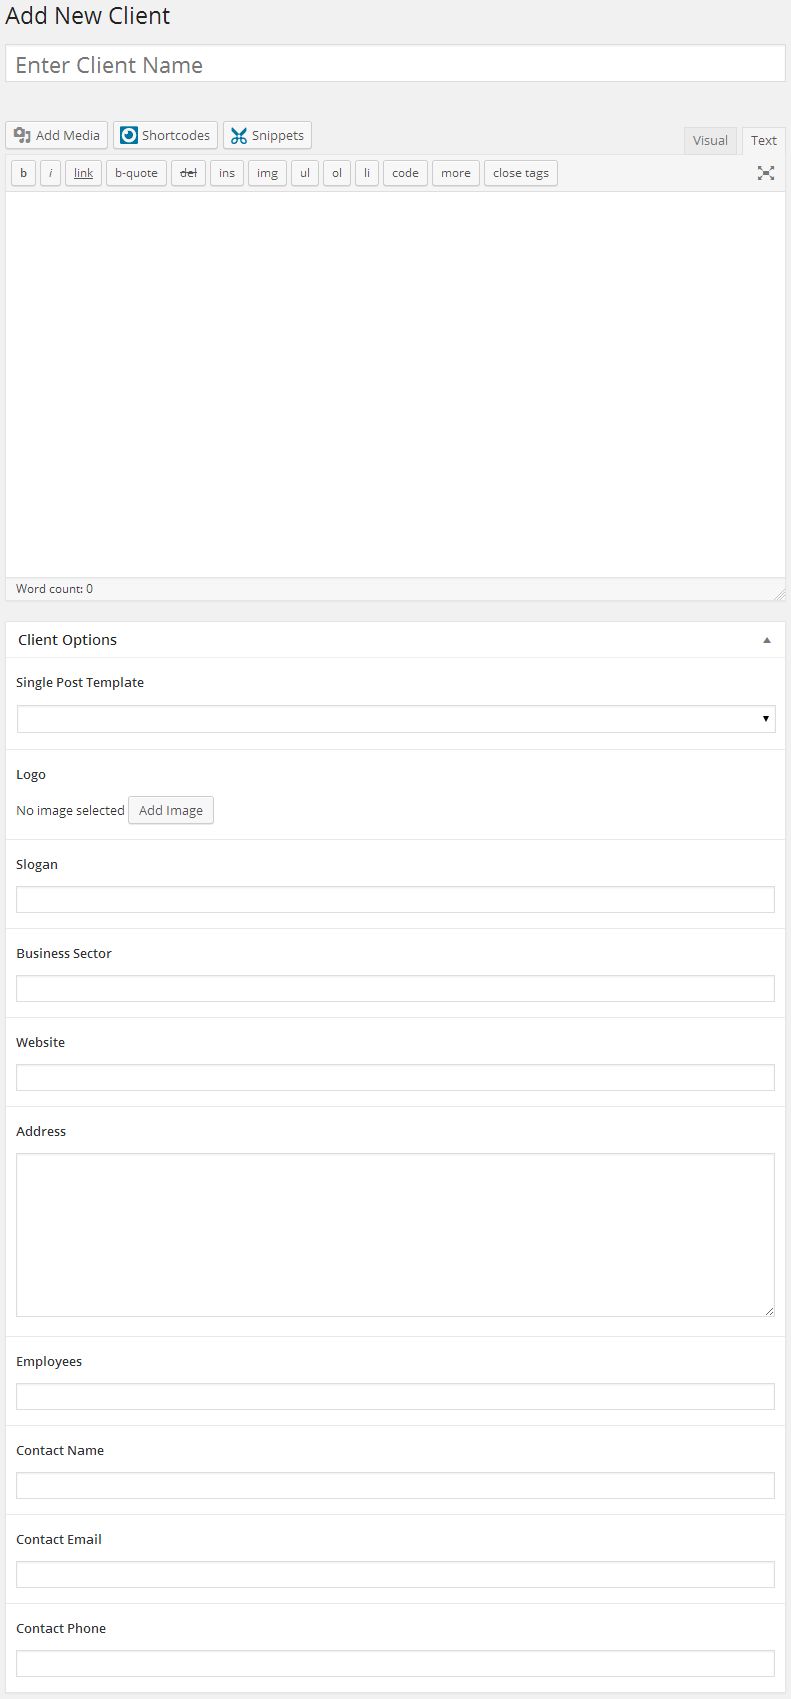
This custom post type allows you to keep track of your clients, and show them off in a number of different templates.

Client Options

Single Post Template
Select the template that you want the single post page to use. These templates can be modified or you can create your own. Please see Templates to learn more.
Slogan
Enter the client's slogan, catch phrase, or leave blank.
Business Sector
What sector does this client serve?
Website
Enter the client's website.
Address
Enter the client's address.
Employees
This is meant for the number of employees that the client employs.
Contact Name
Name of the contact at the client's business/office.
Contact Email
Emailof the contact at the client's business/office.
Contact Phone
Phone number of the contact at the client's business/office.

Coupons Custom Post Type

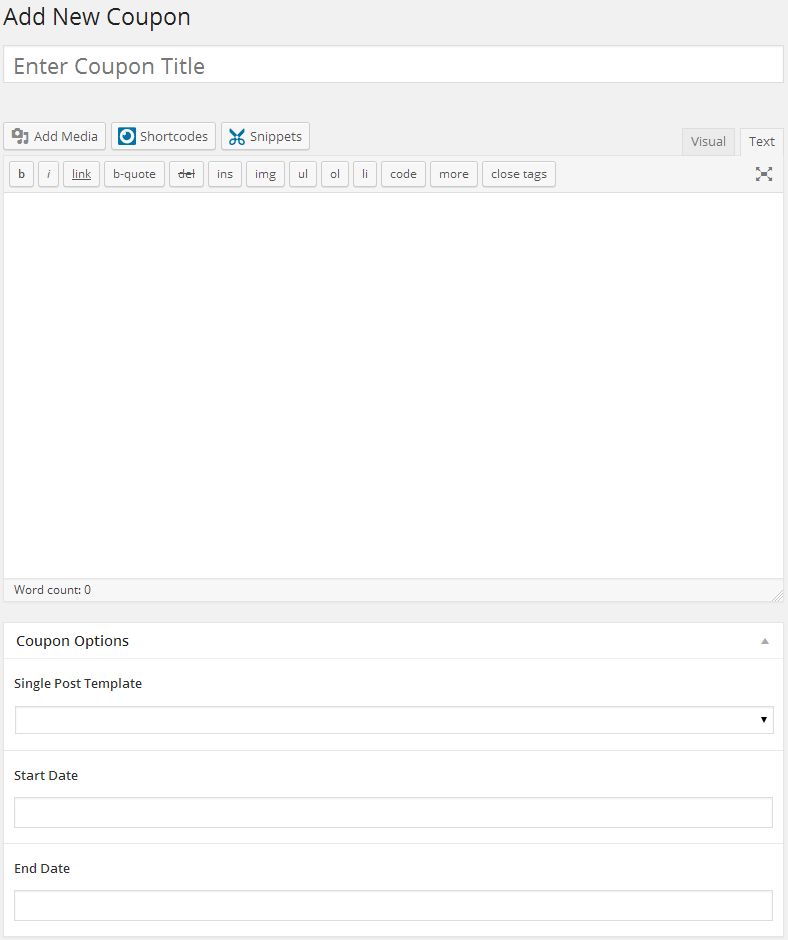
This custom post type allows you to store coupons to be shown on your site. You can also then display the coupons with a number of different templates.

Coupon Options

Single Post Template
Select the template that you want the single post page to use. These templates can be modified or you can create your own. Please see Templates to learn more.
Start Date
The start date of the coupon. Leave blank for no start date.
End Date
Date that the coupon will end. Leave blank if there is no expiration on the coupon.

Events Custom Post Type

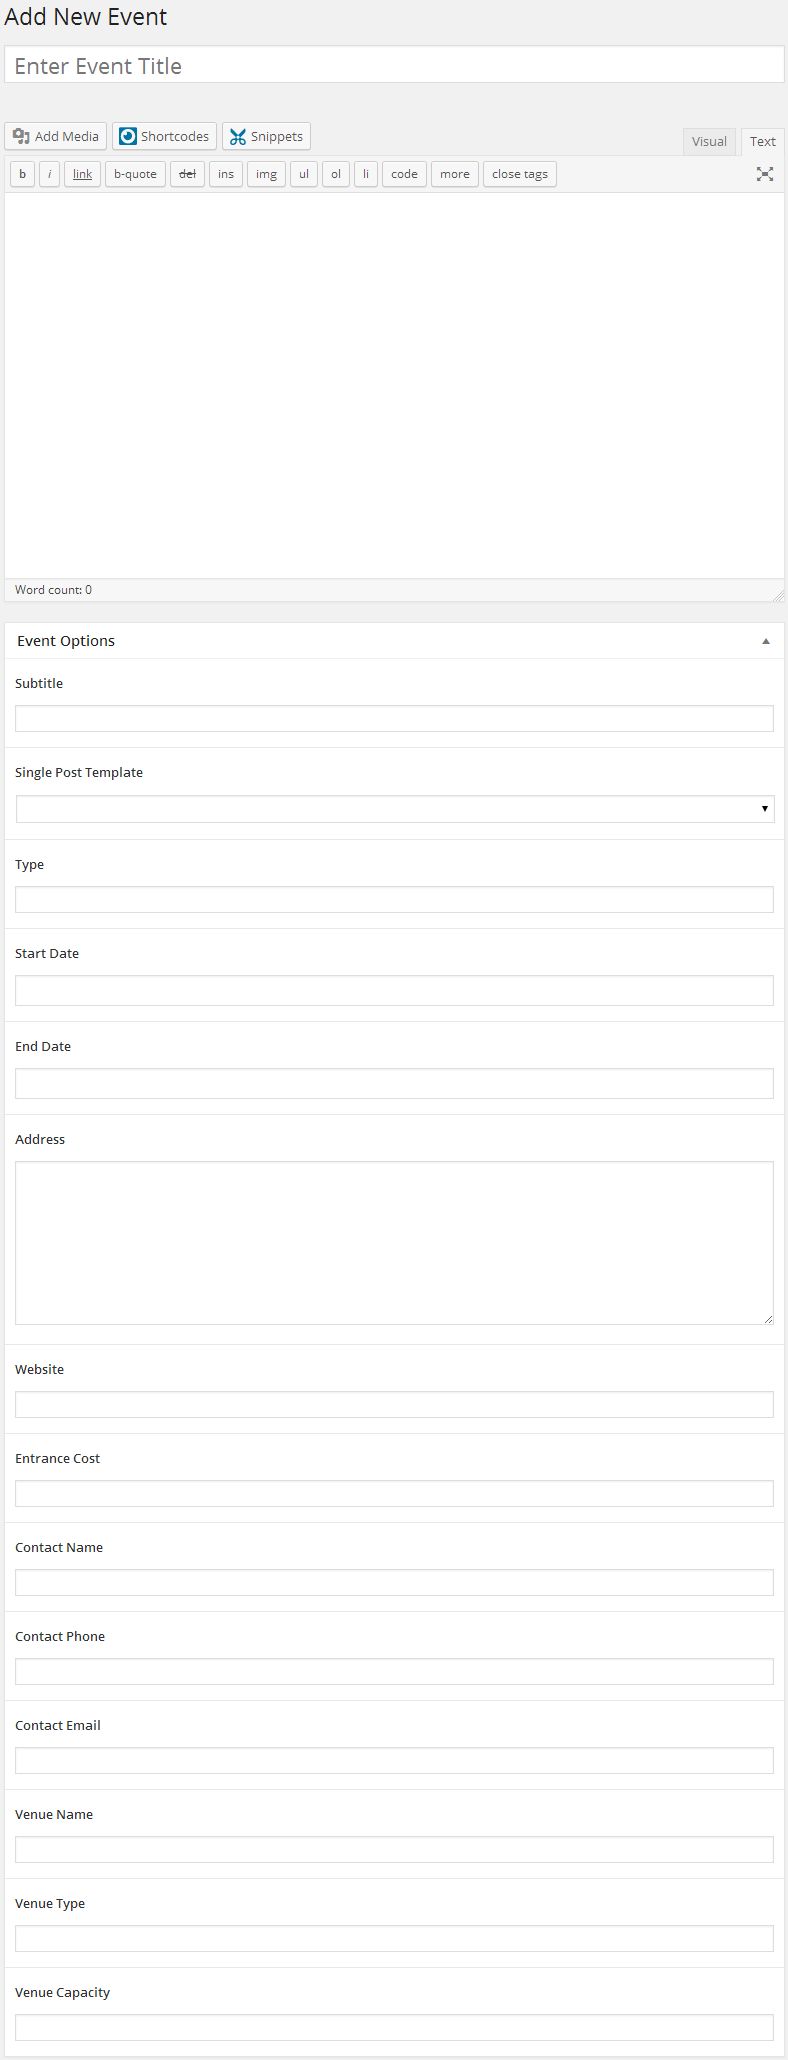
This custom post type allows you to keep track of events, and show them off in a number of different templates.

Event Options

Subtitle
Enter the subtitle of the event, if there is one.
Single Post Template
Select the template that you want the single post page to use. These templates can be modified or you can create your own. Please see Templates to learn more.
Type
Enter the type of event.
Start Date
Date that the event will take place, or the first day that the event will start.
End Date
Date the event will end.
Address
Address of the event or the address where the event will take place.
Website
Website address for the event.
Entrance Cost
What will the cost be to enter the event?
Contact Name
Name of the contact for the event.
Contact Phone
Phone number of the contact for the event.
Contact Email
Email of the contact for the event.
Venue Name
Name of the venue hosting the event.
Venue Type
Type of venue that will host the event.
Venue Capacity
The capacity of the venue.

FAQ Custom Post Type

This custom post type allows you to add frequently asked questions (FAQ's).

FAQ Options

Single Post Template
Select the template that you want the single post page to use. These templates can be modified or you can create your own. Please see Templates to learn more.
External Link
If you want the FAQ to link to a new page rather than expanding the collapsible when clicked,
enter a URL to the page that you want.
External Link Target
blank - Opens the link in a new window or tab (this is default)
self - Opens the link in the same frame as it was clicked
parent - Opens the link in the parent frame
top - Opens the link in the full body of the window
CSS Class
Add a class to the FAQ's. This may help you add additional styles to the FAQ through custom CSS.
Title Background
Set the title background color.
Content Background
Set the content background color.
Title Font Color
Set the font color of the title.
Content Font Color
Set the font color of the content.

Jobs Custom Post Type

This custom post type allows you to add jobs, and display them with a number of different templates.

Job Options

Single Post Template
Select the template that you want the single post page to use. These templates can be modified or you can create your own. Please see Templates to learn more.
Post Date
Date that the job will be posted.
Expire Date
Date that the job opening will expire.
Status
Active - Job is listed as active
Filled - Job has been filled
Closed - Job has been closed
Job Page Link
Link to job posting.
Featured
Yes - This is a featured job
No - This job is not featured
Qualifications
List of qualifications for this job.
Responsibilities
List of responsibilities for this job.
Competencies
List of competencies expected for this job.
Compensation
What is the expected compensation for this job.
Company Name
Name of the company that the job is for.
Company Tagline
What is the company slogan?
Company Logo
Click "Add Image" to add a logo for the company. Select the logo from your media library.
Company Location
Where is the company located?
Company Website
Website of the company that is offering the job.
Contact Name
Name of the contact at the company that is offering the job.
Contact Email
Email address of the contact at the company that is offering the job.
Contact Phone
Phone number of the contact at the company that is offering the job.

Locations Custom Post Type

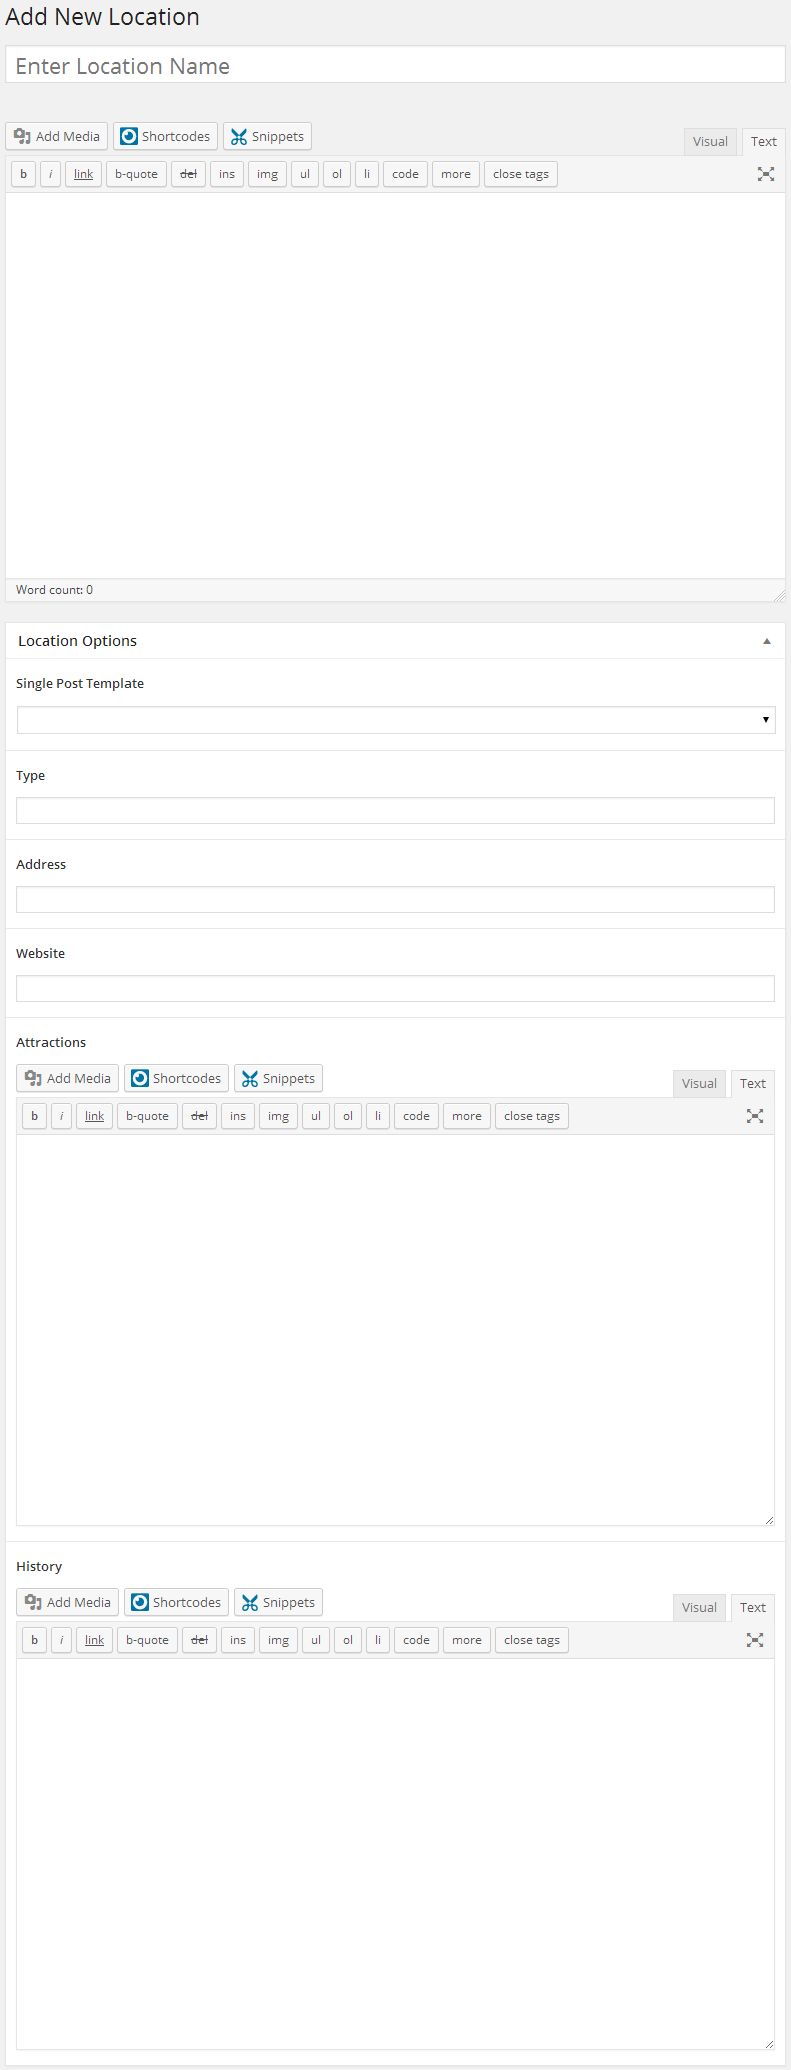
This custom post type allows you to add locations, and display them with a number of different templates. What better way to show off vacations that you've been on or cool places that you've been able to visit?

Location Options

Single Post Template
Select the template that you want the single post page to use. These templates can be modified or you can create your own. Please see Templates to learn more.
Type
Type of location.
Address
Address of location.
Website
Website for the location.
Attractions
What attractions can be found at this location?
History
History about the location.

Movies Custom Post Type

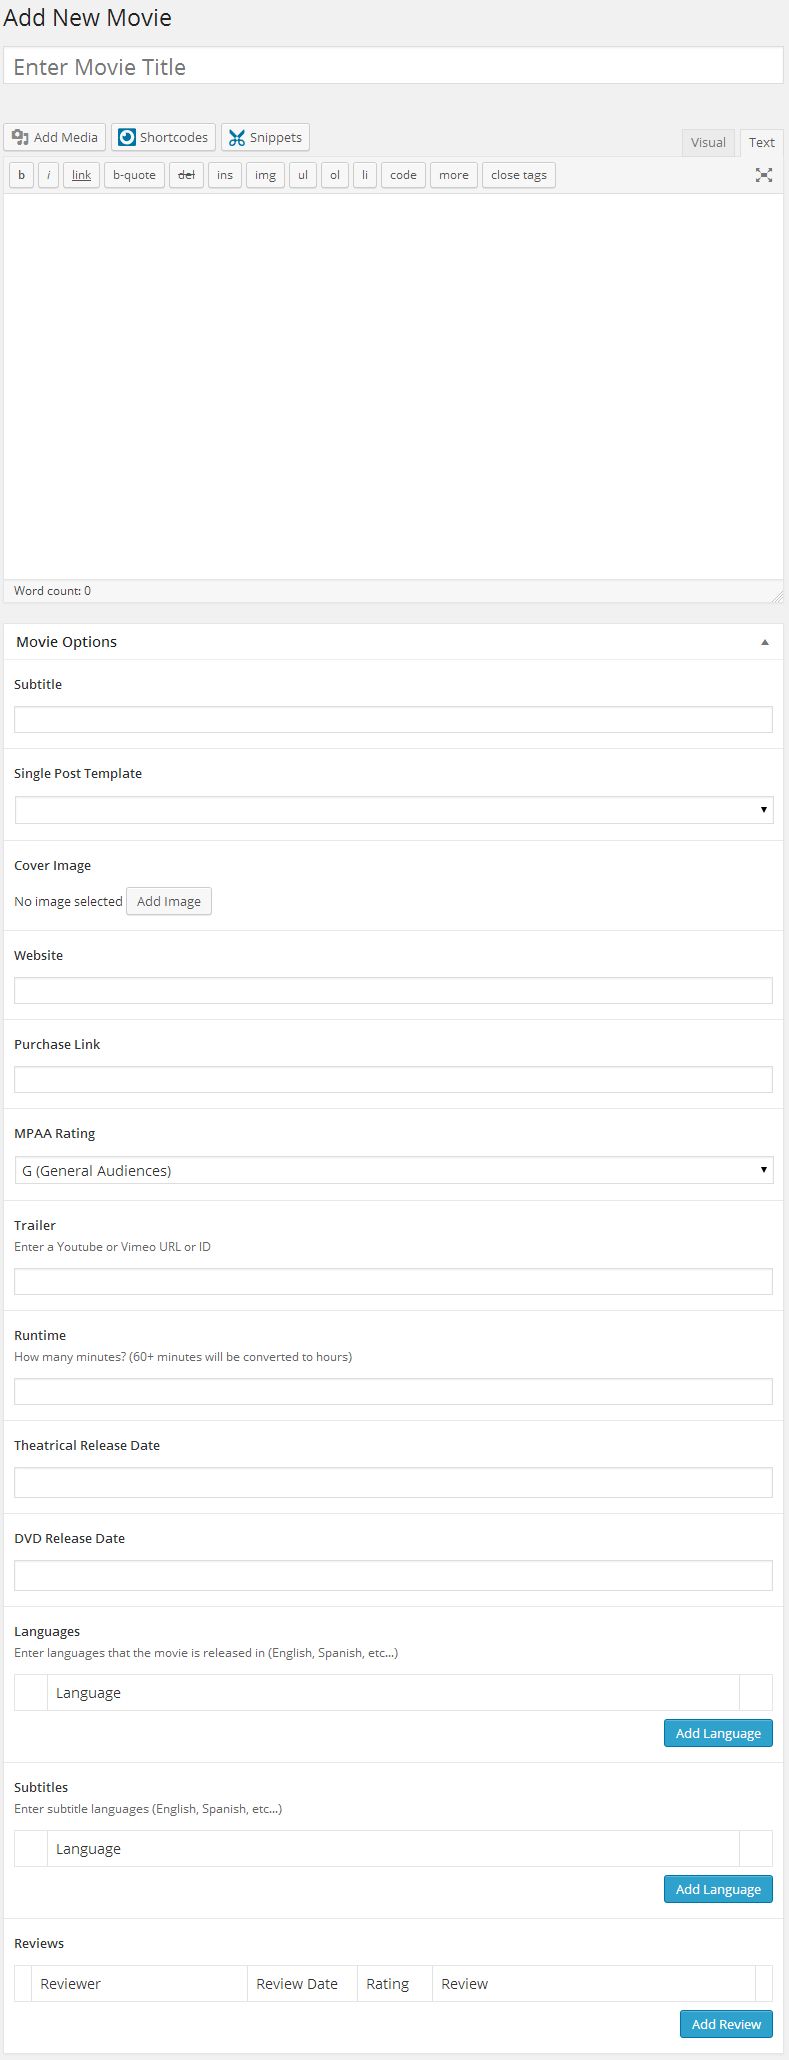
This custom post type allows you to add movies, and display them with a number of different templates.

Movie Options

Subtitle
This is for the subtitle, if the movie has one.
Single Post Template
Select the template that you want the single post page to use. These templates can be modified or you can create your own. Please see Templates to learn more.
Cover Image
Select the cover image for the movie.
Website
Enter the website of the movie.
Purchase Link
This can be used for a link to where to purchase the movie (also can be used for affiliate link to purchase movie).
MPAA Rating
G (General Audiences)
PG (Parental Guidance Suggested)
PG-13 (Parents Strongly Cautioned)
R (Restricted)
NC-17 (No One 17 and Under Admitted)
NR (Not Rated)
Trailer
Enter a URL or ID of a Youtube or Vimeo video.
Runtime
Enter how long the movie is in minutes (60+ minutes will be converted to hours).
Theatrical Release Date
Enter the theatrical release date of the movie.
DVD Release Date
Enter the DVD release date of the movie.
Languages
Enter languages that the movie is released in (English, Spanish, etc...). Click "Add Language" to add languages.
Subtitles
Enter subtitle languages (English, Spanish, etc...). Click "Add Language" to add languages.
Reviews
Click the "Add Review" button, then enter the Reviewer, Review Date, Rating and the Review for the review. To add more reviews, click the "Add Review" button again.

Music Custom Post Type

This custom post type allows you to add music, and display them with a number of different templates.

Music Options

Subtitle
This is for the subtitle, if the music has one.
Single Post Template
Select the template that you want the single post page to use. These templates can be modified or you can create your own. Please see Templates to learn more.
Featured Artists
Select all the featured artists for the album. Add new Artists by clicking the "plus" sign that shows in the upper right corner of the textarea for Artists, or by adding them to the "Artists" list. The list can be found to the right of the editor and just below the "Music Categories" box.
Image
Select the image to be used for the album.
Music Link
Enter the link/URL to the music. Supported sites: Mixcloud, Rdio, Soundcloud, and Spotify.
Audio Clip
Enter the audio file url. Supported formats: mp3, ogg.
Video Type
Select the Video Type (Vimeo, Youtube, or Vevo).
Video Link
Enter the video link/URL to the above mentioned Video Type.
Website
Enter the website of the music album/band/artist.
Release Date
Enter the release date of the music track/album.
Purchase Link
This can be used for a link to where to purchase the music album (also can be used for affiliate link to purchase the music).
Purchase Text
Text to be displayed as the Purchase Link.
Tracks
Click the "Add Track" button, then enter the Title, Artists, Audio Clip, Track Link, Track Purchase Linik, Track Purchase Text, Album(s), Genre(s), Remixer(s), Beats Per Minute (BPM), Key, and Time/Length for the track. To add more tracks, click the "Add Track" button again. See below for information about the fields for tracks.
Reviews
Click the "Add Review" button, then enter the Reviewer, Review Date, Rating and the Review for the review. To add more reviews, click the "Add Review" button again.

Tracks Options

The following options are available when you click on the "Add Track" button in the Music Options shown above.
Title
Enter the title of the track.
Artists
Select all the artists for the track. Add new Artists by clicking the "plus" sign that shows in the upper right corner of the textarea for Artists, or by adding them to the "Artists" list. The list can be found to the right of the editor.
Audio Clip
Enter the audio file URL for this track. Supported formats: mp3, ogg.
Track Link
Enter the link/URL to the track. Supported sites: Mixcloud, Rdio, Soundcloud, and Spotify.
Track Purchase Link
This can be used for a link to where to purchase the music track (also can be used for affiliate link to purchase the track).
Track Purchase Text
Text to be displayed as the Track Purchase Link.
Album(s)
Select all the albums for the track. Add new Albums by clicking the "plus" sign that shows in the upper right corner of the textarea for Album, or by adding them to the "Albums" list. The list can be found to the right of the editor.
Genre(s)
Select all the genres for the track. Add new Genres by clicking the "plus" sign that shows in the upper right corner of the textarea for Genre(s), or by adding them to the "Genres" list. The list can be found to the right of the editor.
Remixer(s)
Select all the remixers for the track. Add new Remixers by clicking the "plus" sign that shows in the upper right corner of the textarea for Remixer(s), or by adding them to the "Remixers" list. The list can be found to the right of the editor.
BPM (Beats Per Minute)
Enter the Beats Per Minute (BPM) for the track.
Key
Enter the key of the track.
Time/Length
Enter the time/length of the track.

News Custom Post Type

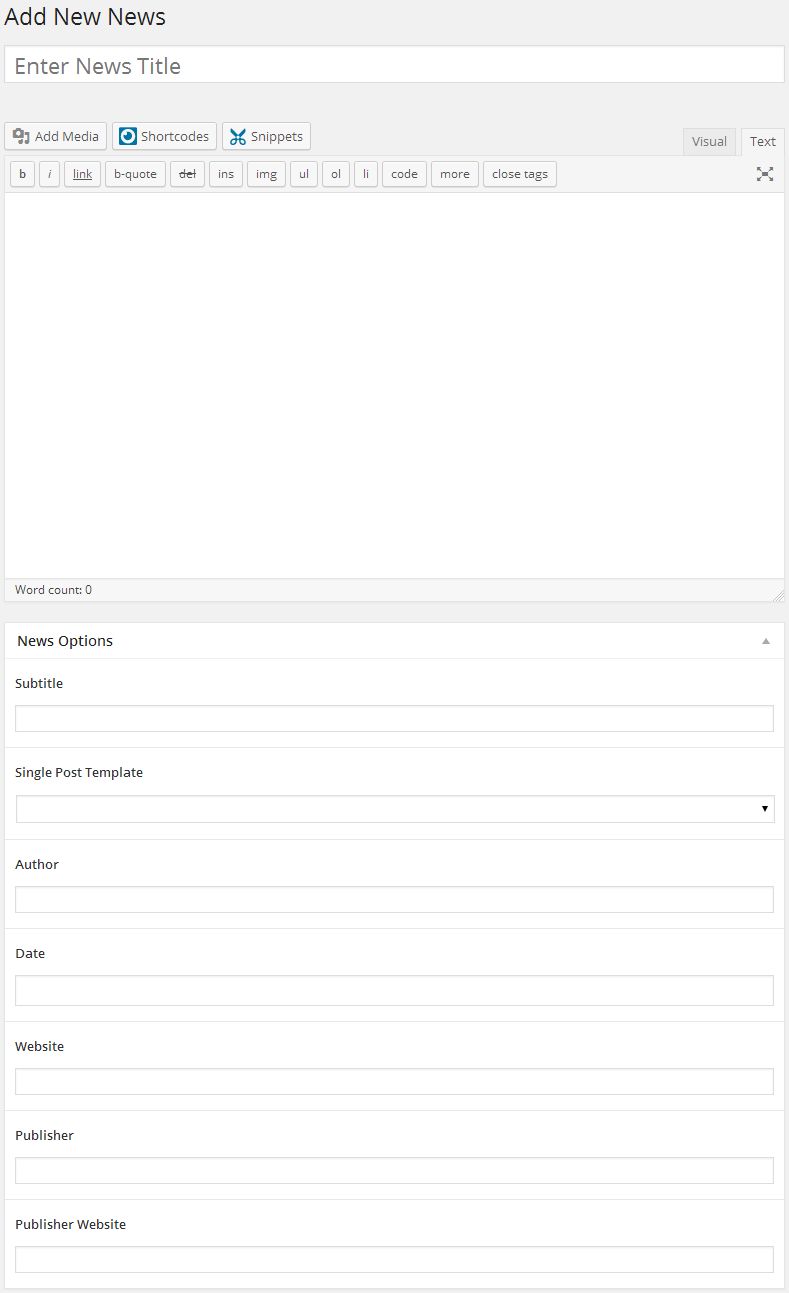
This custom post type allows you to add news articles, and display them with a number of different templates.

News Options

Subtitle
This is for the subtitle, if the news article has one.
Single Post Template
Select the template that you want the single post page to use. These templates can be modified or you can create your own. Please see Templates to learn more.
Author
Author of the news article
Date
Date that the news article was written and/or published.
Website
Website address to the article.
Publisher
The publisher of the news article.
Publisher Website
The website address of the publisher.

Portfolio Custom Post Type

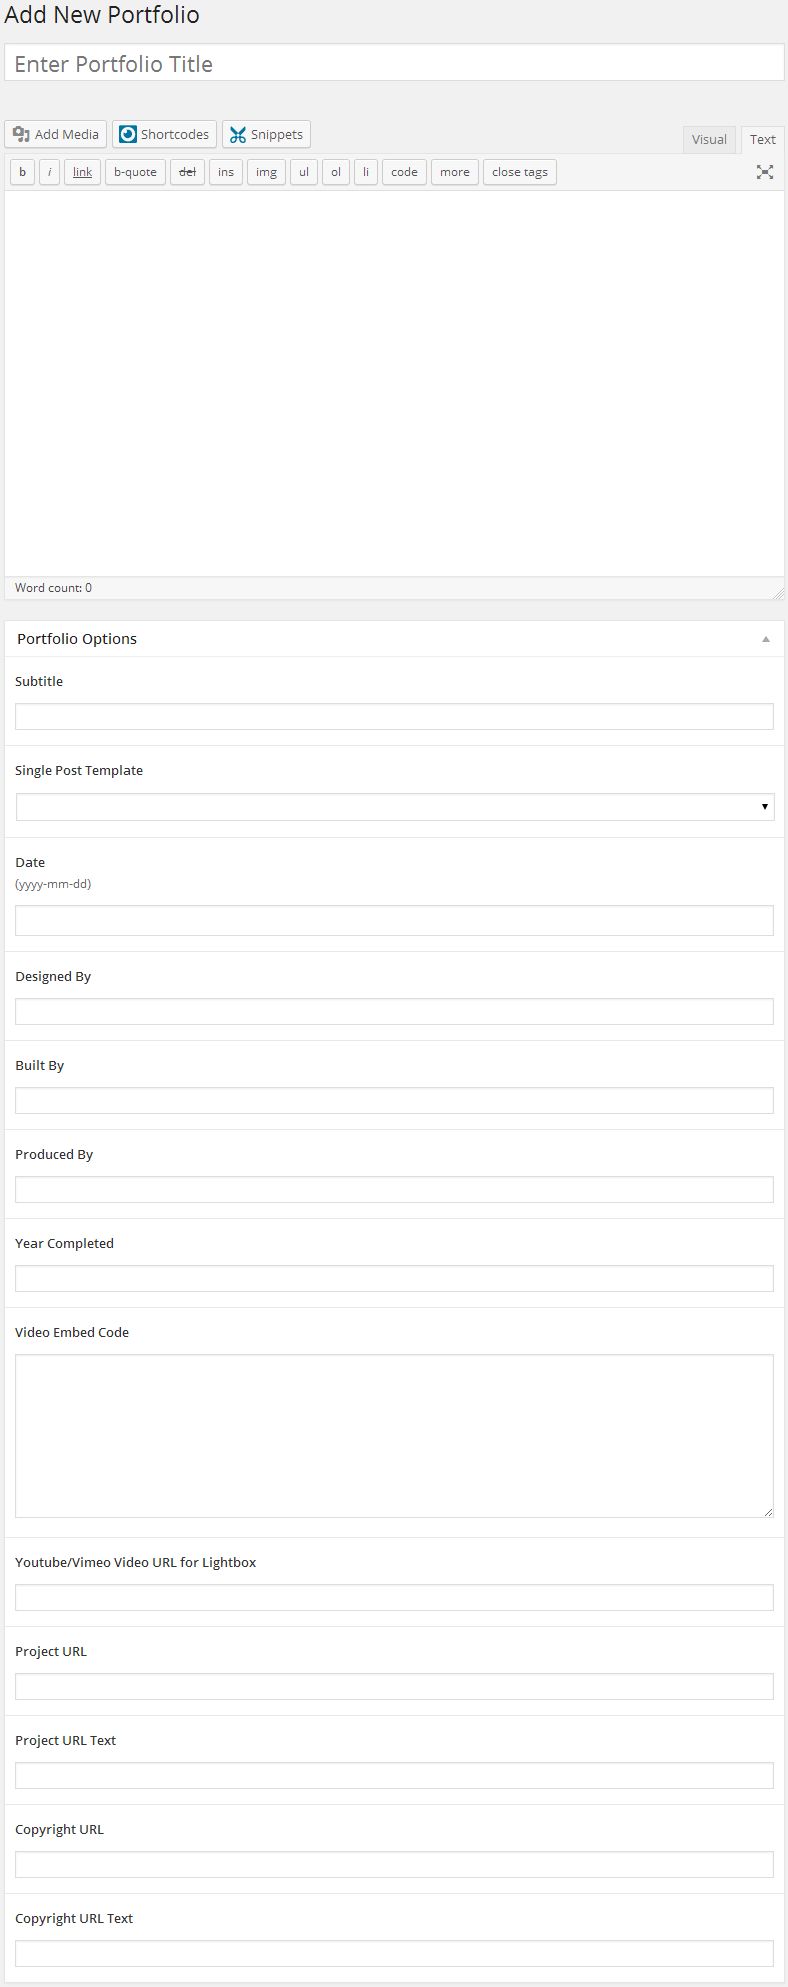
This custom post type allows you to create your portfolio, and display it with a number of different templates.

Portfolio Options

Subtitle
This is for the subtitle, if the portfolio has one.
Single Post Template
Select the template that you want the single post page to use. These templates can be modified or you can create your own. Please see Templates to learn more.
Date
Enter the date that the project was started or completed, whichever you choose. This option requires the date to be in "yyyy-mm-dd" format
Designed By
Who was this project designed by?
Built By
Who was this project built by?
Produced By
Who was the project was produced by?
Year Completed
The year the project was completed.
Video Embed Code
Enter your video embed code here.
Youtube/Vimeo Video URL for Lightbox
Video URL for lightbox.
Project URL
URL to direct the user to when the Project link is clicked.
Project URL Text
Text to be displayed as link to project URL.
Copyright URL
URL to direct the user to when the Copyright link is clicked.
Copyright URL Text
Text to be displayed as link to copyright URL.

Quotes Custom Post Type

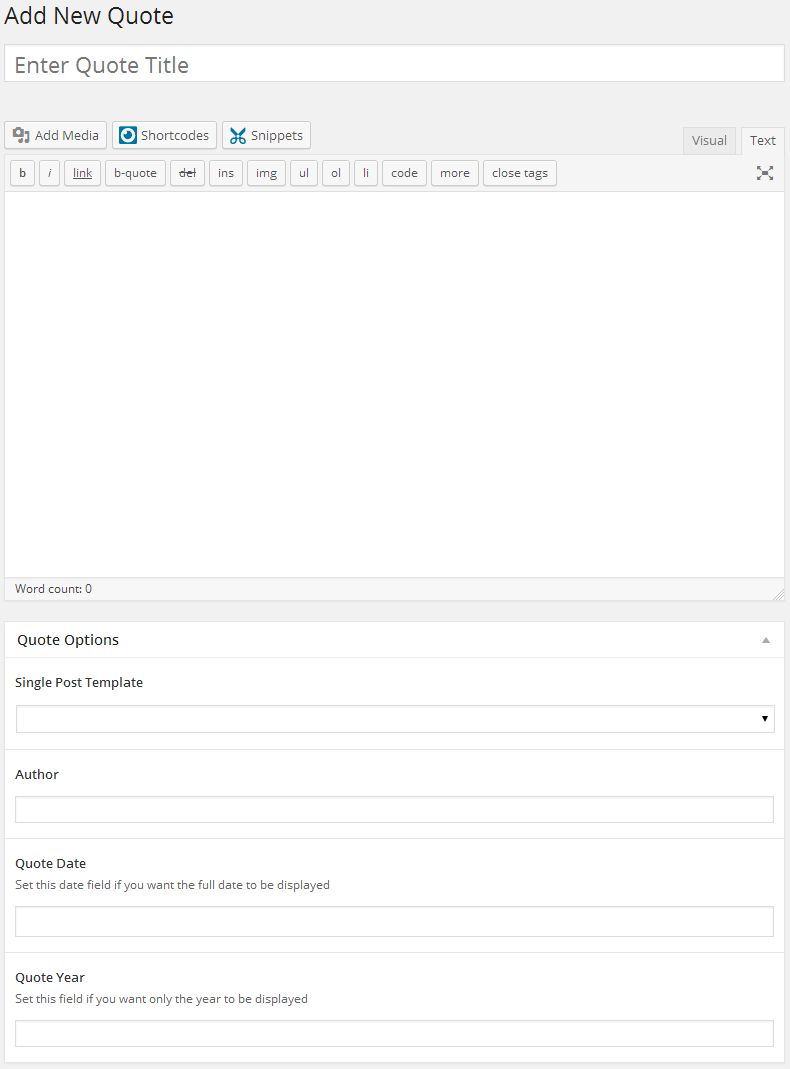
This custom post type allows you to create a list of quotes, and display them with a number of different templates.

Quote Options

Single Post Template
Select the template that you want the single post page to use. These templates can be modified or you can create your own. Please see Templates to learn more.
Author
Enter the author of the quote.
Quote Date
Set this field if you know the date of the quote and if you want the full date to be displayed. It is best to only enter one, Quote Date or Quote Year.
Quote Year
Set this field if you know the year of the quote and if you want the year to be displayed. It is best to only enter one, Quote Date or Quote Year.

Recipes Custom Post Type

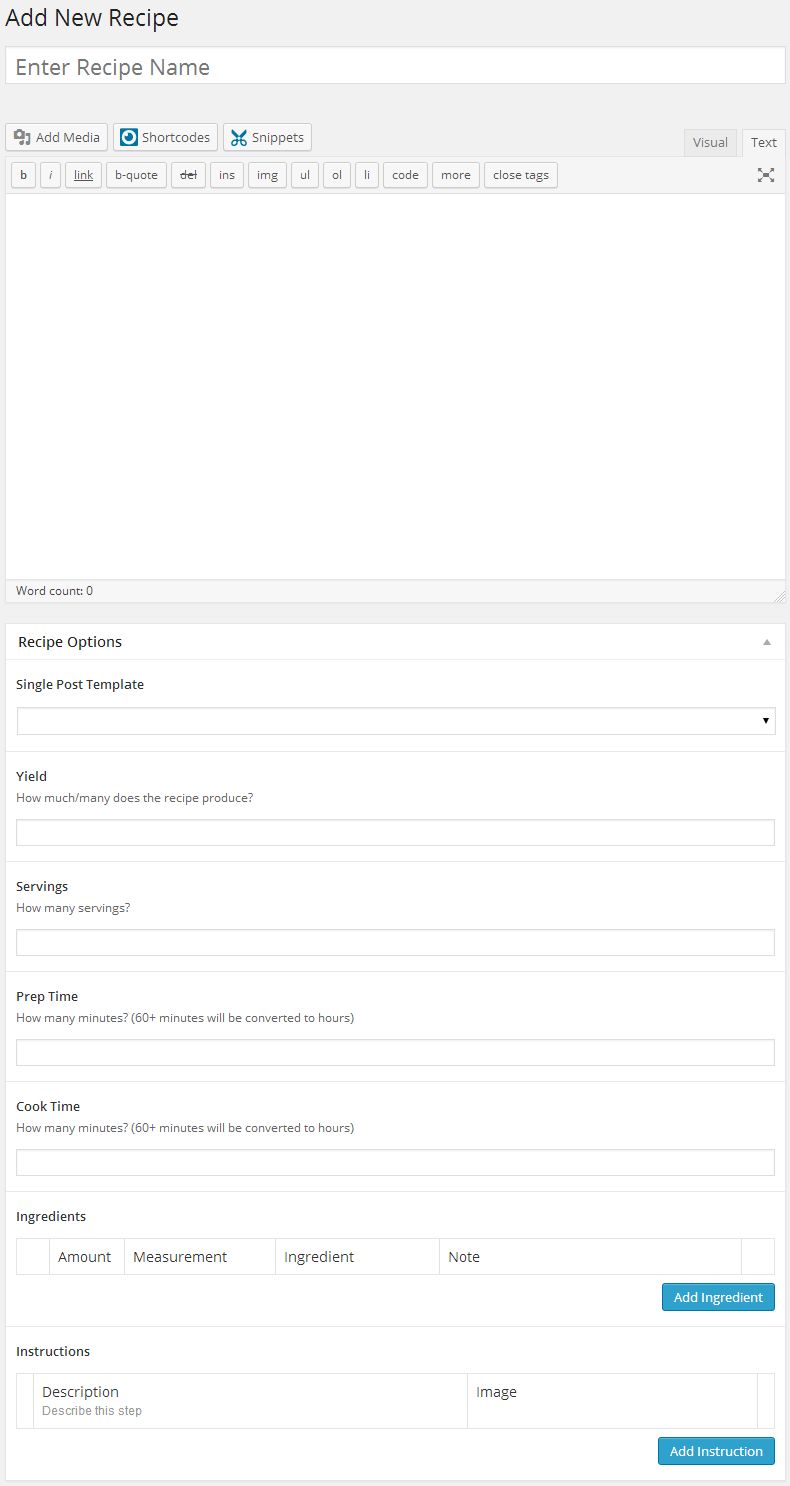
This custom post type allows you to create a list of recipes, and display them with a number of different templates. This is a perfect way to show off your favorite family recipes.

Quote Options

Single Post Template
Select the template that you want the single post page to use. These templates can be modified or you can create your own. Please see Templates to learn more.
Yield
How much/many does the recipe produce?
Servings
How many servings does this recipe produce?
Prep Time
How many minutes does it take to prep for this recipe? (60+ minutes will be converted to hours)
Cook Time
How many minutes does it take to cook this recipe? (60+ minutes will be converted to hours)
Ingredients
Click the "Add Ingredient" button, then enter the Amount, Measurement, Ingredient and Note. To add more ingredients, click the "Add Ingredient" button again.
Instructions
Click the "Add Instruction" button, then enter the Description and Image (if you want an image). To add more instructions, click the "Add Instruction" button again.

Snippets Custom Post Type

The snippets custom post type allows you to save snippets of code that can be easily reused on other pages with the use of the snippets shortcode. This can speed up the process of creating pages that include same content. For instance, if you have a button that states the current price, "Buy Now - $18", you can easily add a snippet that displays this button. If your price goes up to $20, you only need to change the snippet custom post and all shortcodes/pages that use the snippet will be changed.

Enter your snippet into the content area, just as you would a page or post.

The Snippets custom post type does not have any metabox options.

Team Custom Post Type
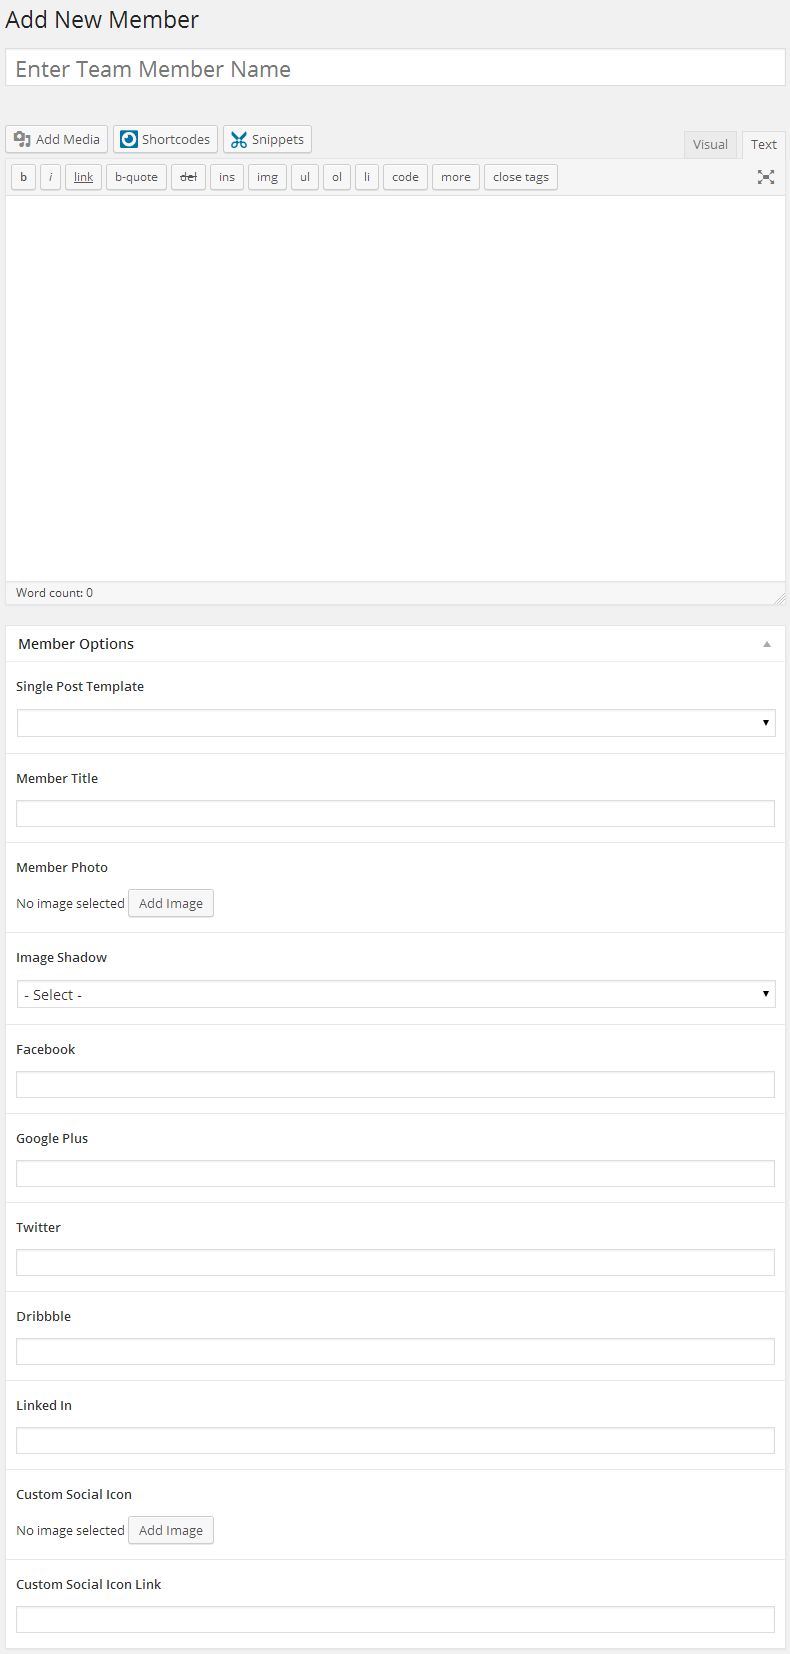
This custom post type allows you to add a team (typically a work team or list of employees), and display them with a number of different templates.

Member Options

Single Post Template
Select the template that you want the single post page to use. These templates can be modified or you can create your own. Please see Templates to learn more.
Member Title
This is for the Title of team member (example: Chief Executive Officer)
Member Photo
Select an image for the team member.
Image Shadow
Select a shadow if you want one to be displayed under the image.
Facebook
Link to members Facebook page.
Google Plus
Link to members Google Plus page.
Twitter
Link to members Twitter page.
Dribbble
Link to members Dribbble page.
Linked In
Link to members Linked In page.
Custom Social Icon
Select an image from your media library to be used as a custom social icon.
Custom Social Icon Link
URL that your custom social icon will link to.

Templates Custom Post Type

The templates custom post type allows you to be creative and build your own templates. With the use of the Post Fields shortcode and/or the Post Meta Data shortcode, you can display any of the metabox data inside of your template. You can also show the content, title, and/or featured images. This allows you to create templates in the editor without having to know how to write the code and having to deal with files.

You can create templates that are used for the single post page or you can create templates that are for showing items in a list. When showing your items in a list, you get to chose from a one, two, three, four, or six column layout. This gives you a lot of flexibility to build your templates the way you want. Have fun, be creative and share your templates with us if you would like.
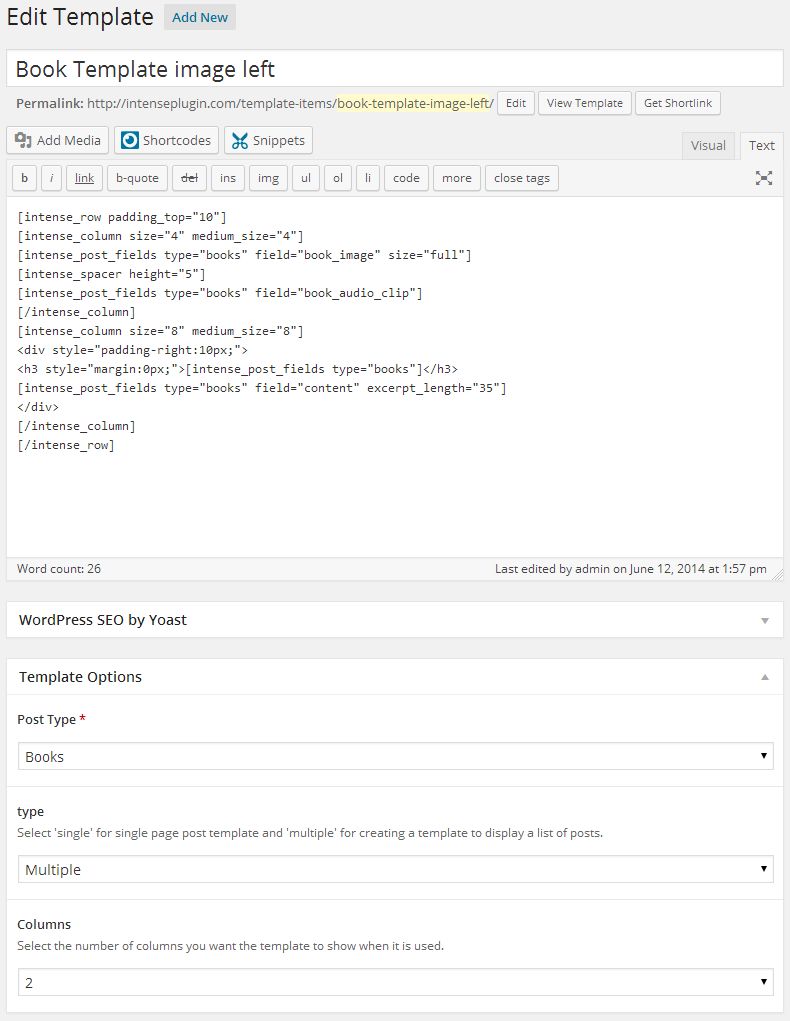
Example of template being used

Template Options

Post Type
Select the post type that you want this template to be used with.
Type
Select "single" when you are creating a single page post template or "multiple" when you are creating a template that will display a list of posts for the selected post type.
Columns
If you have selected "Multiple" for Type, this option allows you to set how many columns will be shown when using this template.

Testimonials Custom Post Type

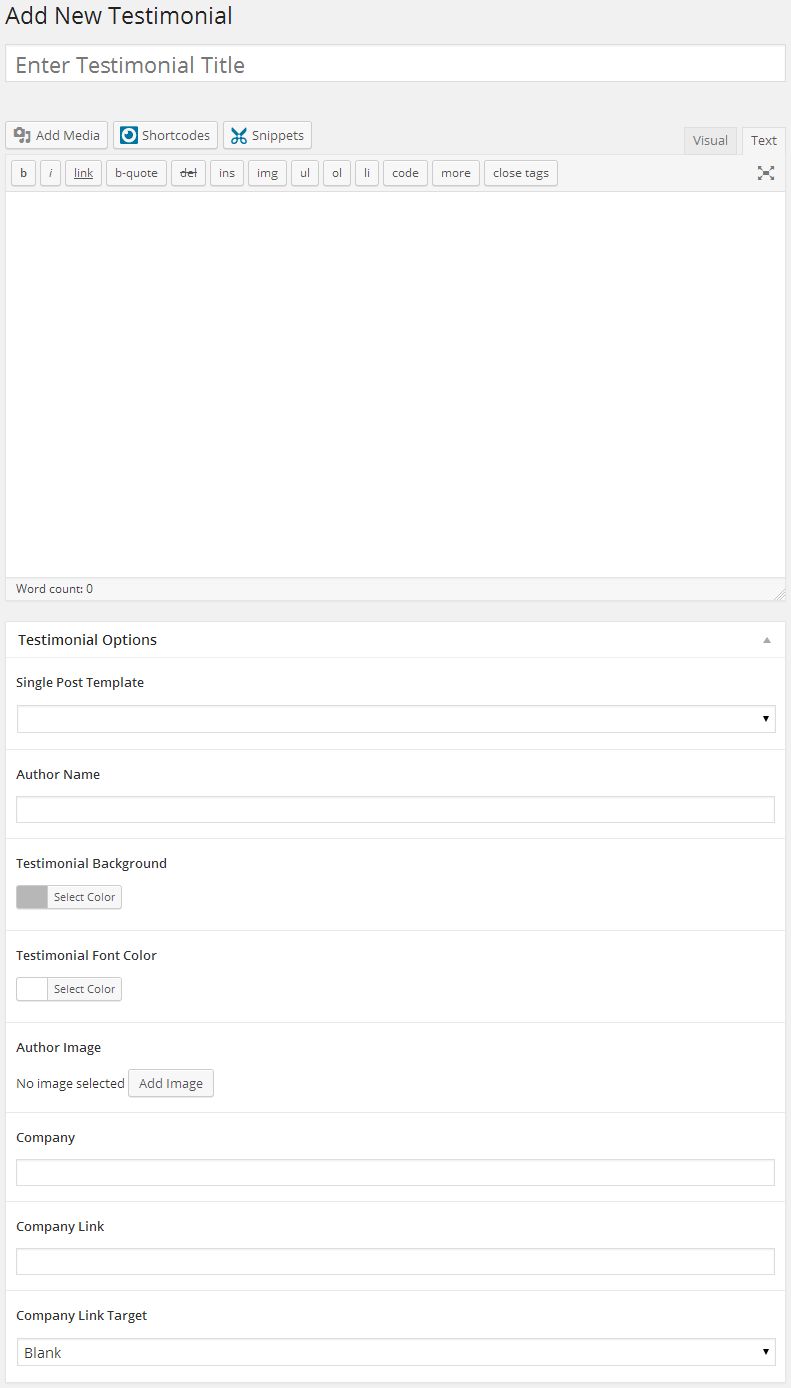
The testimonials custom post type allows you to be creative a list of user testimonials. You will have a number of templates available to show off the testimonials as well.

Testimonial Options

Single Post Template
Select the template that you want the single post page to use. These templates can be modified or you can create your own. Please see Templates to learn more.
Author Name
Name of person that wrote the testimonial
Testimonial Background
Background color to be used while displaying testimonial.
Testimonial Font Color
Font color to be used while displaying the testimonial.
Author Image
Image to be used when displaying the author if the testimonial.
Company
Is this testimonial from a company, if so, who?
Company Link
Link to the company website, if you named a company above.
Company Link Target
blank - Opens the link in a new window or tab (this is default)
self - Opens the link in the same frame as it was clicked
parent - Opens the link in the parent frame
top - Opens the link in the full body of the window

Footer

This section gives you the ability to control nearly all things related to the footer. You can choose the layout of the footer, the template that is being used, and color and border options.

General

Widget Heading Color
Set the widget heading color.

Primary Footer

Show
Turn this option On to show the primary footer and turn it Off to not show the primary footer. This value can be overridden at the page or post level.
Layout
Full or boxed width for footer content
Full width allows the content to extend the entire browser width. With full width, content sections can be used to box the content. If you want the content to always be boxed, then choose boxed.
Template
This option allows you to select a template for the footer. There are a number of templates included with Intensity, but you can also create your own. See Creating Content > Templates for more information.
Template Sections
Check each of the sections that you want to show in the footer. Not all the sections may apply to all the footer templates.
Padding
Top – Set this option to add a top padding (measured in pixels)
Right- Set this option to add a right padding (measured in pixels)
Bottom – Set this option to add a bottom padding (measured in pixels)
Left – Set this option to add a left padding (measured in pixels)
Columns
Set the number of columns you want the footer to be. This may not apply to all the footer templates.
Background
This option allows the control of the header background. You can set the color, transparency, repeat, size, attachment, position, and image for the background of the header. More information on these settings can be found here.
Top Border
Set the different values for the border: the height in pixels, the type of border (solid, dotted, etc…), and the color
Bottom Border
Set the different values for the border: the height in pixels, the type of border (solid, dotted, etc…), and the color
Opacity
Set the opacity for the footer. Default is 100 (0 is completely transparent, 100 is solid).

Secondary Footer

Show
Turn this option On to show the secondary footer and turn it Off to not show the secondary footer. This value can be overridden at the page or post level.
Template
This option allows you to select a template for the secondary footer. There are a number of templates included with Intensity, but you can also create your own. See Creating Content > Templates for more information.
Layout
Full or boxed width for footer content
Full width allows the content to extend the entire browser width. With full width, content sections can be used to box the content. If you want the content to always be boxed, then choose boxed.
Background
This option allows the control of the header background. You can set the color, transparency, repeat, size, attachment, position, and image for the background of the header. More information on these settings can be found here.
Top Border
Set the different values for the border: the height in pixels, the type of border (solid, dotted, etc…), and the color
Bottom Border
Set the different values for the border: the height in pixels, the type of border (solid, dotted, etc…), and the color
Padding
Top – Set this option to add a top padding (measured in pixels)
Right- Set this option to add a right padding (measured in pixels)
Bottom – Set this option to add a bottom padding (measured in pixels)
Left – Set this option to add a left padding (measured in pixels)
Opacity
Set the opacity for the secondary footer. Default is 100 (0 is completely transparent, 100 is solid).

Shortcodes

With tons of shortcodes to choose from, Intense WordPress Site Builder allows you to quickly create beautiful pages. Since each shortcode comes with many options, it is simple to make the shortcodes fit the look of your website. Intense enables you to build modern layouts like the pros with little effort.

Check out the image to the right to see all of the available shortcodes with Intense.
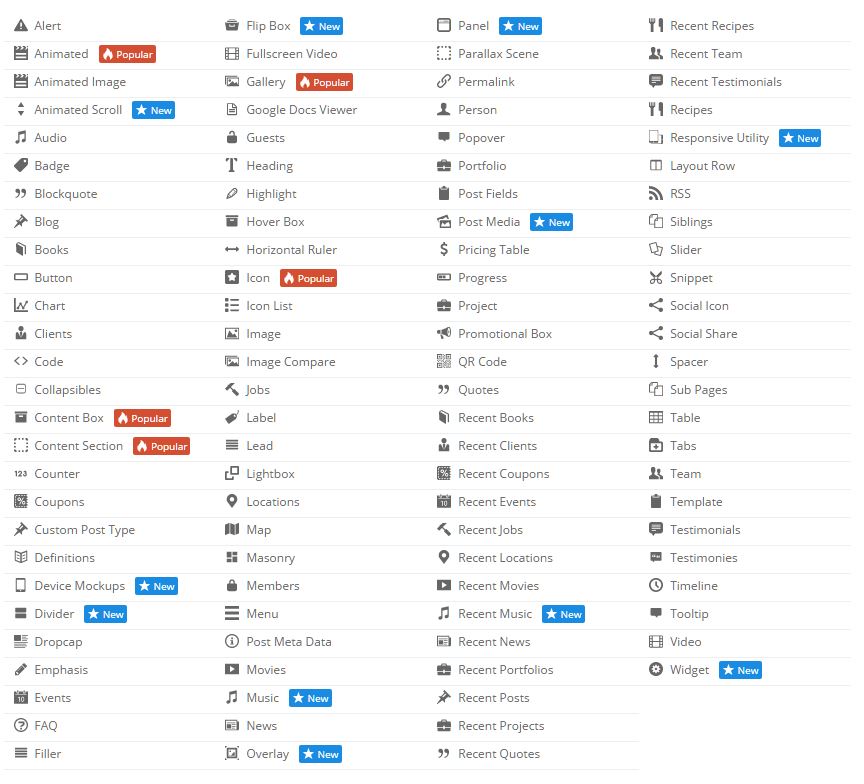
*Click the above image to see a larger version.

What Is A Shortcode?

“A shortcode is a WordPress-specific code that lets you do nifty things with very little effort. Shortcodes can embed files or create objects that would normally require lots of complicated, ugly code in just one line. Shortcode = shortcut.” – WordPress.com

“Shortcodes in WordPress are little bits of code that allow you to do various things with little effort. They were introduced in WordPress 2.5, and the reason to introduce them was to allow people to execute code inside WordPress posts, pages, and widgets without writing any code directly. This allows you to embed files or create objects that would normally require a lot of code in just one single line.” – wpbeginner.com

How To Use A Shortcode?

A shortcode is wrapped in brackets ([]). Most shortcodes have an opening and a closing shortcode. The opening shortcode will have the brackets surrounding it. The closing shortcode will have the brackets, but will also have a “/” in it as the first character inside of the brackets. Here is an example button shortcode.
shortcode:
[intense_button]Button[/intense_button]
result:
Button
The above shortcode has the opening shortcode, [intense_button], and the closing shortcode, [/intense_button]. The text “Button” in the middle is the text on the button.

Shortcodes will typically have additional options available that allow the user to tailor the result to their liking. If we use the example above and we want to change the size and color of the button and add an icon, the shortcode might look like the following.

shortcode:
[intense_button size=”large” color=”success” icon=”heart”]Button[/intense_button]
result:
Button

Example Shortcodes

//Here is an example of an Animated shortcode that uses an Image shortcode
[intense_animated type=”fadeIn” trigger=”delay” delay=”1500″]
[intense_image imageid=”9739″ size=”square75″ /]
[/intense_animated]
//Here are a few examples of Button shortcodes
[intense_button gradient=”1″ border_radius=”2″ color=”muted”]Gradient[/intense_button]
[intense_button size=”large” color=”success” icon=”heart”]Icon Left[/intense_button]
[intense_button size=”large” color=”primary” border_radius=”5″]Radius 5px[/intense_button]
//Here is an example of an Alert shortcode
[intense_alert]
This is a standard alert.
[/intense_alert]

WooCommerce

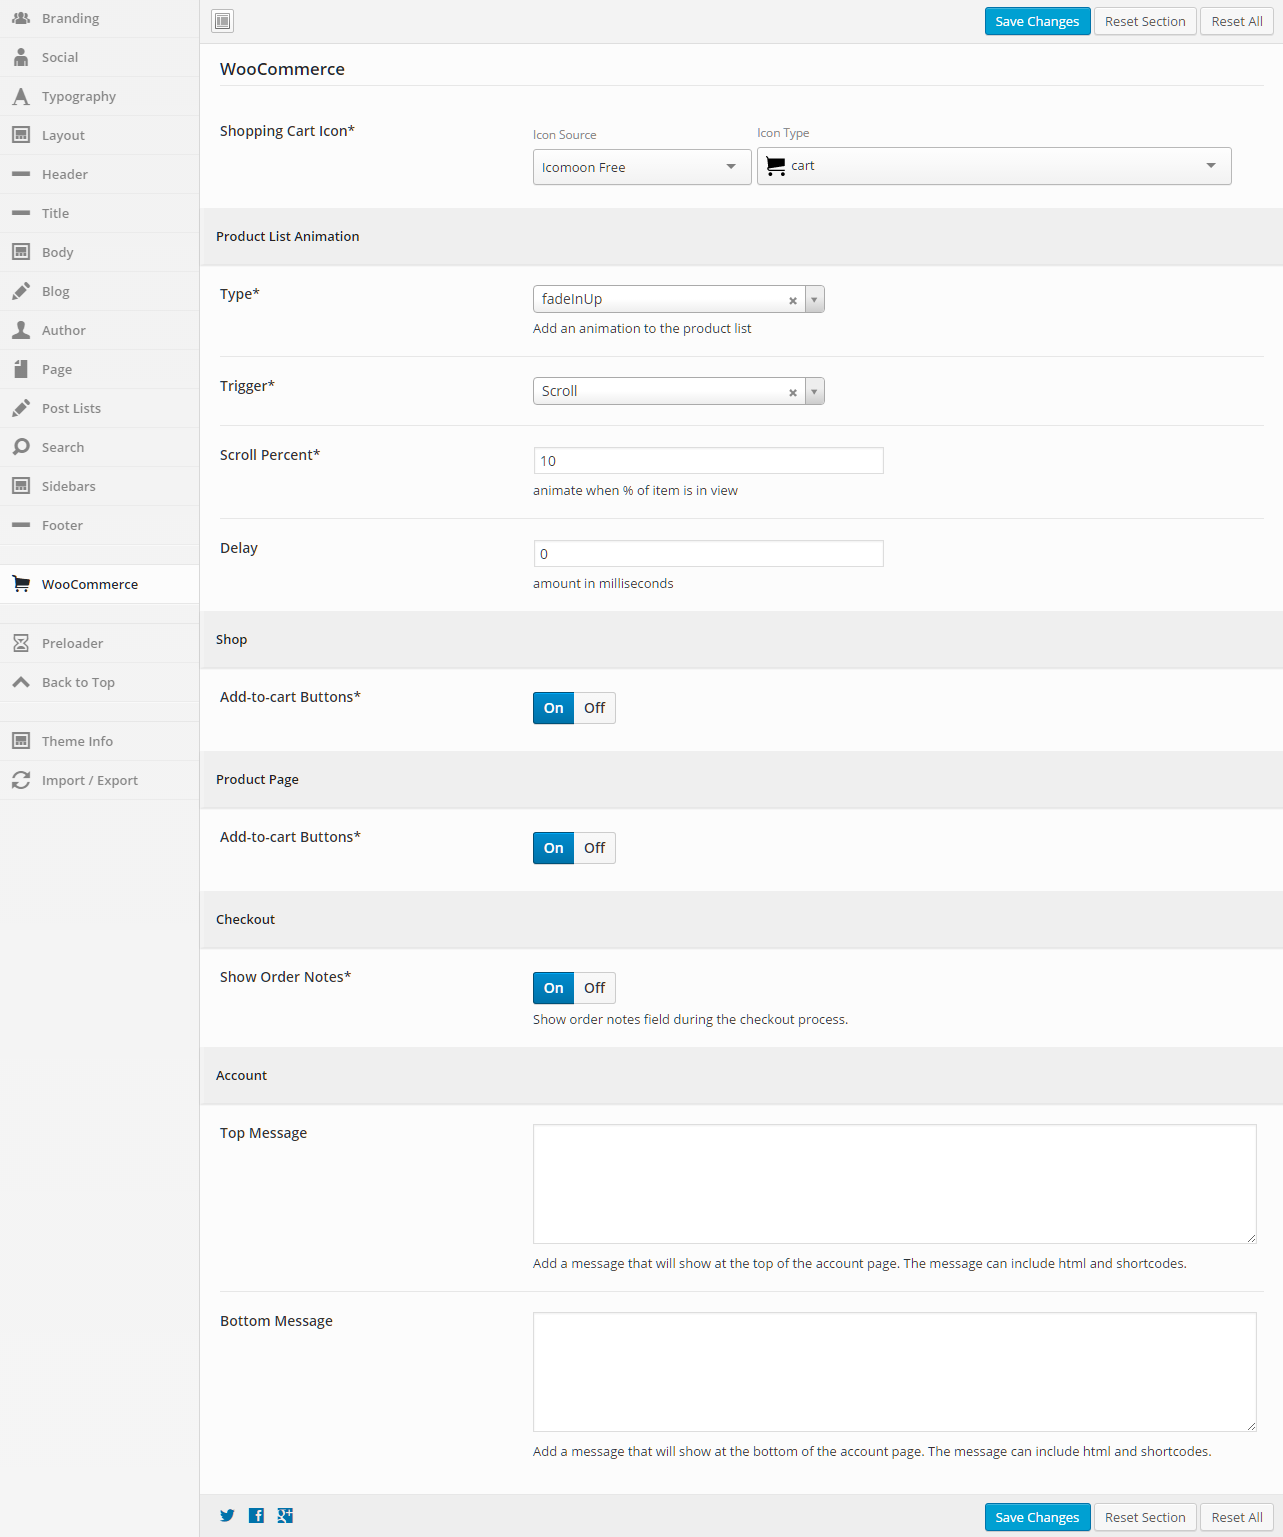
This section gives you the ability to control different aspects of how Intensity displays WooCommerce products.

General

Shopping Cart Icon
Set the icon to be used for the WooCommerce shopping cart.
Select an Icon Source, then the Icon Type will be populated.

Product List Animation

Type
Add an animation to the product list.
Trigger
Select the trigger that will initiate the animation (scroll, hover, click, or delay).
Scroll Percent
When this percent of the product is in view, the product will animate. This option is only available if “Scroll” is selected for the Trigger.
Delay
Set this option if you want to delay the animation. The amount is in milliseconds.

Shop

Add-to-cart Buttons
Set this field to “On” to show Add-to-cart buttons on shop page.

Product Page

Add-to-cart Buttons
Set this field to “On” to show an Add-to-cart button on product pages.

Checkout

Show Order Notes
Set this field to “On” to show order notes field during the checkout process.

Account

Top Message
Add a message that will show at the top of the account page. The message can include html and shortcodes.
Bottom Message
Add a message that will show at the bottom of the account page. The message can include html and shortcodes.

SMK Sidebar Generator

Intensity allows you to create as many sidebars as you want with the use of SMK Sidebar Generator.

SMK Sidebar Generator is a required plugin.

About SMK Sidebar Generator

SMK Sidebar Generator allows you to generate as many sidebars as you need. Then allows you to place them on any page you wish.

Features include:

  • Unlimited number of sidebars.
  • Replace default theme sidebars using the conditions or globaly just by selecting the sidebar that you want to replace.
  • Show the generated sidebars on any page you wish without touching a single line of code in your theme.
  • Drag to sort sidebar position.
WordPress.org GitHub

Snippets

What Are Intense Snippets?

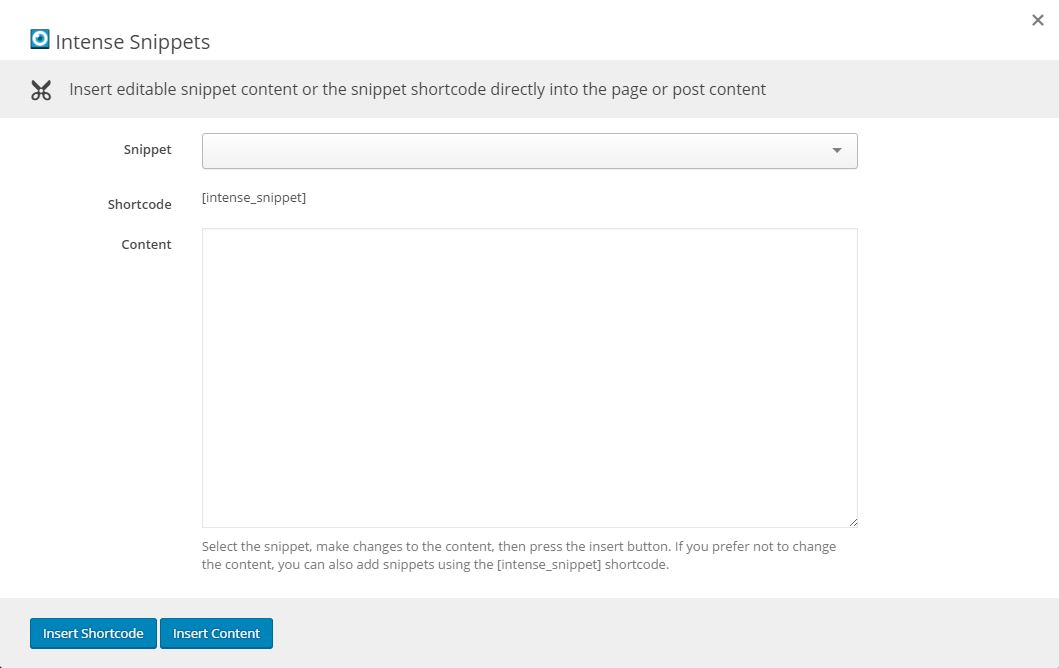
Intense snippets are bits of content that can be reused on pages and posts. They can be added using the snippet shortcode or the content can be placed directly on the page using the snippet button.
*Click on the image to see what the Snippets dialog looks like.
Snippets can be added/updated/removed from the WordPress admin pages or saved as files on disk.
Where Are They?

Intense snippets can exist in four different locations:

  • Saved within WordPress – these snippets are added/updated/and removed via the WordPress admin pages. They are saved within the WordPress database.
  • The plugin – in the snippets folder within the plugin’s main folder. THESE SHOULD NEVER BE CHANGED
  • The theme – in the intense_snippets folder within the theme’s main folder.
  • The child theme – in the intense_snippets folder within the child theme’s main folder.

How Do I Change Them?

To change the snippets, copy the folder from the download to your child theme’s or theme’s main folder. At that point, you can edit the files and the plugin will use your edited version instead of the default version.

Can I Add My Own?

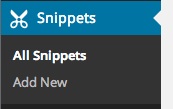
One way to add snippets is through the snippets admin page. You can add snippets like you would any regular post or page.
You can add your own snippet files within the snippet folders. The file should include a header in the following format:
<?php
/*
Intense Snippet Name: [YOUR SNIPPET NAME HERE]
*/
You can also create directories to organize the snippets. Directories should not be more than one level deep.

Snippets Custom Post Type

If you are looking for information on the Snippets Custom Post Type, please look in the Custom Post Types or click here.

Which Snippets Are Available By Default?

By default, we have included snippets for our example pages. The library of snippets will continue to grow to include more snippets to help you more quickly build your site.

Preloader

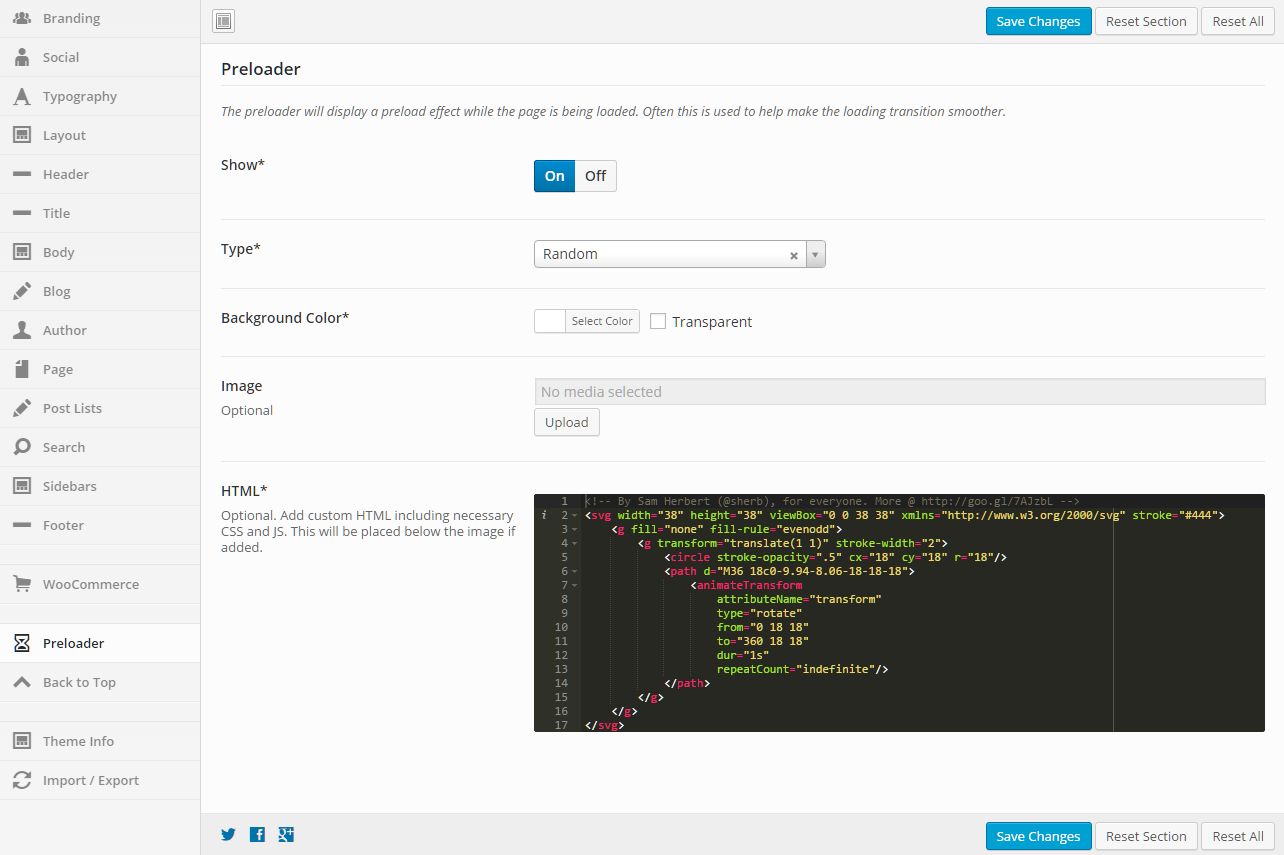
This section gives you the ability to control the preloader. The preloader will display a preload effect while the page is being loaded. Often this is used to help make the loading transition smoother.

General

Show
Set this option to “On” if you want to show the preloader.
Type
Set this option if you want an effect to happen before the preloader and then after the preloader. This adds a transition effect as the content appears on the page.
Background Color
Set the background color of the page for the preloader
Image
Select an image that you want to show on the page as it is preloading.
HTML
Optional. Add custom HTML including necessary CSS and JS. This will be placed below the image if added.
This can be used to display a spinning icon or any HTML of your choice.