Navigate to the Intensity Install Demos page.
Find the demo you wish to install and click Install to start importing the demo.
Wait for the installation to finish. It may take several minutes depending on the demo and connection speed. When complete, you will see a prompt telling you the demo has been imported.

Common Issues
Sorry, something unexpected occurred during installation.
This error is most likely due to your server environment settings. Typically the server execution time limit is too low or there isn’t enough memory available. Ask your host to increase the PHP max_execution_time and/or the memory_limit settings.
If you import the demo data more than once, there are a few things that may be duplicated. For the most part, this duplicate data can easily be cleaned up manually. To do so, locate the duplicate content and delete it from the system. For example, if you have multiple duplicated menu items, you would edit the menu and manually remove the items.
If you want to completely start over, you can use one of the following plugins:
Alternate Installation Method
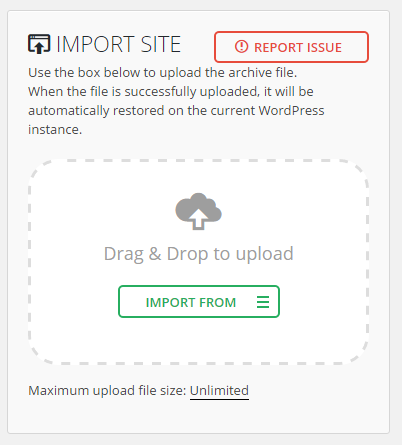
Install and activate the All-in-One WP Migration plugin.
Navigate to the All-in-One WP Migration Import page.
Click the Import From button and select the demo file you have downloaded (see below for download links). You can also drag and drop the file within the upload box.
The file will be uploaded to your server and processed. Once done, you will see a prompt warning you about your database being overwritten. When ready, click the Continue button.
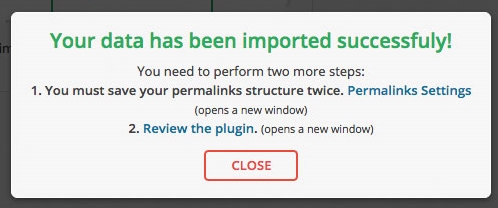
Wait for the installation to finish. When done, you will see a message letting you know that the import completed successfully. Click the Close button.
After the installation has finished, you will be logged out and will need to log back into the website. You will not be able to log back in with the users that you initially set up since the database has been reset. Use the following username and password to log in:
After logging in, you can change the username and password to something more secure.
Alternate Demo Installation Downloads
Performance and Site Optimization
If your site is not performing as fast as you’d like, there could be a few different issues. Our live demo is a representation of how fast your site should be. Results will vary depending on the items below. This post will outline the common issues that can slow your site down and the ways that you can correct these common issues.Important Note Before Getting Started: While you are building and developing your site, it’s advised to turn off caching. This is especially important if you are working with our support team. It’s possible to implement a change, and not have it take place because a cached version of the page or various resources are loading instead of the latest version.
Plugins – Plugin management is a very crucial piece of making sure that your site continues to run smoothly. You have to make sure that you keep your plugins up-to-date, but even that isn’t enough to guarantee peak performance. Each plugin can hinder the performance of your site. The more plugins you have, the slower your site may perform. It is best to keep your plugin list down to only the plugins that you are using. If you have plugins that are not activated and you don’t use them, go ahead and remove them as well. Anything that you can do to cut down the amount of space used and the potential conflicts between your theme and/or plugins, the better off you will be. Images/Content – Image compression is a crucial part of making your site load fast, but most people forget it and then are left wondering why their site loading speed is very slow. Images are one of the biggest part of your website. An image heavy site can still be quick if you watch out for some of the following:First of all always try to use JPEG or GIF images rather than PNG images since they are smaller in size. A lot of people upload their big images and WordPress will crop them in all the different thumbnail sizes and you will insert the image with the proper thumbnail size in the post and then people think it’s all set. This is not the case. If you upload a big, uncompressed image, WordPress will crop that large image, which will make images that are still uncompressed. It is best to compress your images first, then upload them to WordPress, so that all of the cropped images will be compressed and optimized.
There are different ways on how to compress images. Below are a couple of services and WordPress plugins you can use to optimize your images for decreased loading times.
- WP Smush Pro is a cloud based image optimizing plugin, that works on a API based system, that allows you with a few clicks to send your images for optimizing and also includes lossless compression with its Super Smush option.
- Kraken.io is another cloud based image optimization service, the main difference being, they not only have a WordPress plugin you can use, but you can also optimize images directly on their website, rather than using the plugin.
- Ewww Image Optimizer is another cloud based image optiomization plugin, that also allows you to optimize and compress images to decrease load times.
If you are creating images in Photoshop a common thing that people do wrong is save the images without using the option “Save for Web & Devices”. This is very crucial since you can set the compression and quality rate and other things which will lead to a smaller image size. Other image editing programs can do the same so always look in the documentation for image compression.
Server/Hosting – Sometimes slow speed can be the result of your hosting service. Some hosting services use shared hosting which can have an effect on speed. This is a very broad topic but the general idea is that some hosts are better than others. Here are a couple that we suggest looking into if you are experiencing slow speed time from your host.- DreamHost has an easy 1-click WordPress install that makes it dead simple to set up a new site. DreamHost is a Los Angeles based hosting provider that has been hosting sites since 1997.
- Bluehost comes highly recommended within the blogging world. It also has an easy 1-click WordPress install. Bluehost is one of the top 20 hosting companies and host over 2 millions websites.
- WP Engine provides best-in-class customer service on top of innovation-driven technology. They have over 30,000 customers in 120 countries. WP Engine makes managed WordPress hosting simple, scalable, and secure.
* Disclosure: the three links provided above are affiliate links. They won’t cost you anything additional and, if you use them and decide to purchase, we will earn a small commission.
With all of that said, we highly recommend using the W3TC plugin to optimize your site’s speed. All premium themes should be using a cache plugin and W3TC is the best one to use.
Consider Using gZIP Compression – gZIP compression is bundling (zipping) pages on a web server before the page is sent to the visitor. This saves bandwidth and therefore increases the loading speed of the page significantly. The visitors’ web browser then automatically unzips the pages. This compressing and unzipping only takes a fraction of a second.The W3 Total Cache plugin offers gZIP compression as an option, so if you are using the W3 Total Cache plugin, you can easily enable the gZIP option. If you would prefer to control gZIP on your own, without the use of the W3 Total Cache plugin, you can easily accomplish this by adding just a few lines of code to your .htaccess file. The easiest way to enable the gZIP compression for your images, CSS and JS files is to add these lines to your .htaccess file in the root WordPress folder:
## ENABLE GZIP COMPRESSION ##
AddOutputFilterByType DEFLATE text/plain
AddOutputFilterByType DEFLATE text/html
AddOutputFilterByType DEFLATE text/xml
AddOutputFilterByType DEFLATE text/css
AddOutputFilterByType DEFLATE application/xml
AddOutputFilterByType DEFLATE application/xhtml+xml
AddOutputFilterByType DEFLATE application/rss+xml
AddOutputFilterByType DEFLATE application/javascript
AddOutputFilterByType DEFLATE application/x-javascript
## ENABLE GZIP COMPRESSION ##- Cloudflare: We use Cloudflare on our theme and plugin demo sites. It works great, integrates nicely with W3 Total Cache, and best of all it’s free.
- MaxCDN: MaxCDN is a great option and has very reasonable pricing for the services they provide.
Skins let you change the overall look of the shortcodes without changing the individual attribute values on the shortcode dialog. Skins make it easy to change the look of the shortcodes to match your site design. Also, if you change themes, you can change the skin and have all your existing shortcodes change as well without having to go to each page/post.
Another benefit of skins is they allow you to define alternate looks of your shortcodes. To do so you can create more than one skin and select which one to use on the shortcode dialog.
Saved Locations and Priority
There are two ways skins are saved. You can create skin files and save them within your theme or child theme. Skin files for themes should be placed within a intense_skins folder in the theme or child theme. An easy way to create a skin file is to export an existing skin and save it to the correct location.
Skins are also saved in the database. If you use the skin builder, any changes to skin file skins or new skins will be saved in the database. If you want to transfer the settings to a new installation, export the database skin and save it to a file.
There is a priority used to determine which skin to load. Skins with the same key will be loaded in the following priority ordered by highest priority:
- Database
- Child Theme
- Theme
- Intense Plugin
Skin Builder
The skin builder lists the individual shortcodes along with the ability to change the default attribute values. When using the skin builder, any changes you make to shortcode attributes will automatically be saved to the skin. Not all attributes are skinnable. Only the skinnable attributes will be shown.


Logo
Site Information
Intensity is built to work perfectly with Max Mega Menu, a free plugin for creating mega menus.
Max Mega Menu is an optional plugin.

About Max Mega Menu
WordPress Mega Menus, made easy.
Easy to use drag & drop WordPress Mega Menu Plugin. Create widgetized mega menus using the built in visual mega menu builder.
WordPress.org View WebsiteIntensity is designed to work perfectly with Contact Form 7. Enjoy creating contact forms, email signups and other forms with Contact Form 7 and Intensity.
Contact Form 7 is an optional plugin.

About Contact Form 7
Just another contact form plugin. Simple but flexible.
Contact Form 7 can manage multiple contact forms, plus you can customize the form and the mail contents flexibly with simple markup. The form supports Ajax-powered submitting, CAPTCHA, Akismet spam filtering and so on.
WordPress.org View Website
General

General
Content

General
Blog Meta Data
Single Page
