
General
Left/Right Header Width
Content Width
Intensity uses a 12 column grid system. Below you can pick how many columns to use for the sidebars when they are enabled. The size of the content area will be calculated based on the number of columns left over. If there are zero or less columns left over, the content will be a full 12 columns wide.
For example, if the left and right sidebars are enabled and set to size 3, then the content will be “total number of columns” – “left sidebar columns” – “right sidebar columns” or 12 – 3 – 3 = 6 columns wide.
The following options are the same for both the right and left sidebars, so the options are only being listed once, but you can control both sidebars in Intensity.
Left/Right Sidebar

General
Header Tags
Links
Posts, Pages, and Other Content
Header
Title
Sidebar
Footer
Custom Font 1 & Custom Font 2

General
The Social and Custom Icon Options shown below apply to all of the following sections found on the Social tab.
- Google+
- RSS
- YouTube
- Custom 1
- Custom 2
- Custom 3
Social and Custom Icon Options
Navigate to the Intensity Install Demos page.
Find the demo you wish to install and click Install to start importing the demo.
Wait for the installation to finish. It may take several minutes depending on the demo and connection speed. When complete, you will see a prompt telling you the demo has been imported.

Common Issues
Sorry, something unexpected occurred during installation.
This error is most likely due to your server environment settings. Typically the server execution time limit is too low or there isn’t enough memory available. Ask your host to increase the PHP max_execution_time and/or the memory_limit settings.
If you import the demo data more than once, there are a few things that may be duplicated. For the most part, this duplicate data can easily be cleaned up manually. To do so, locate the duplicate content and delete it from the system. For example, if you have multiple duplicated menu items, you would edit the menu and manually remove the items.
If you want to completely start over, you can use one of the following plugins:
Alternate Installation Method
Install and activate the All-in-One WP Migration plugin.
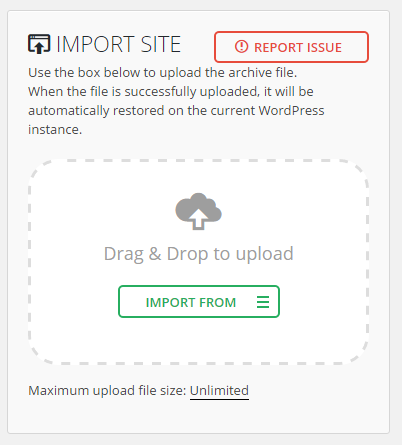
Navigate to the All-in-One WP Migration Import page.
Click the Import From button and select the demo file you have downloaded (see below for download links). You can also drag and drop the file within the upload box.
The file will be uploaded to your server and processed. Once done, you will see a prompt warning you about your database being overwritten. When ready, click the Continue button.
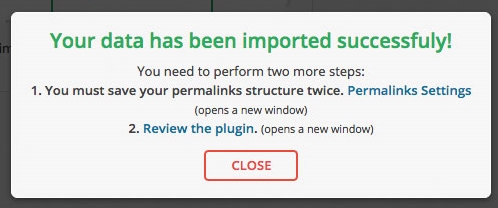
Wait for the installation to finish. When done, you will see a message letting you know that the import completed successfully. Click the Close button.
After the installation has finished, you will be logged out and will need to log back into the website. You will not be able to log back in with the users that you initially set up since the database has been reset. Use the following username and password to log in:
After logging in, you can change the username and password to something more secure.
Alternate Demo Installation Downloads
Intensity is built to work perfectly with Max Mega Menu, a free plugin for creating mega menus.
Max Mega Menu is an optional plugin.

About Max Mega Menu
WordPress Mega Menus, made easy.
Easy to use drag & drop WordPress Mega Menu Plugin. Create widgetized mega menus using the built in visual mega menu builder.
WordPress.org View Website
Logo
Site Information
WordPress child themes allow you to apply custom changes to your site without the worry of your changes being deleted when the parent theme is updated. Continue reading if you would like to learn how to use or create a child theme.
While child themes are a great way to apply custom changes to Intensity (the parent theme), they are generally used to customize the core code of the parent theme. We cannot provide support for customizations of this kind, as they fall outside our scope of support and we will be unable to assist you with issues that may arise.
What Is A Child Theme
A child theme is a theme that inherits the functionality and styling of another theme, called the parent theme. Child themes are the recommended way of modifying an existing theme.Why Use A Child Theme
There are a few reasons why you would want to use a child theme:- If you modify a theme directly and it is updated, then your modifications may be lost. By using a child theme you will ensure that your modifications are preserved.
- Using a child theme can speed up development time.
- Using a child theme is a great way to learn about WordPress theme development.
Installing The Intensity Child Theme
You cannot install a child theme without the parent theme being installed, so make sure to install Intensity prior to installing the Intensity Child Theme. Open up your WordPress dashboard/admin, i.e (yourdomain.com/wp-admin) and login. On the right hand side click on “Appearance”, you should now have what looks like the screenshot below. As you can see in the screenshot below, there are a couple of “Add new theme” buttons, click either one. When you get to the screen that looks like the screenshot below, click on the “Upload Theme” button.
 When you get to the screen that looks like the screenshot below, click on the “Browse” button and find the Intensity Child Theme that you want to install. The download from ThemeForest includes a number of child themes for Intensity that you can install.
 Once you have selected the child theme that you want to install and the name is shown next to the “Browse” button, go ahead and click “Install” to start the installation of the child theme.
 When you get to the screen that looks like the screenshot below, the child theme has successfully been installed and now all you have to do is to click the “Activate” link to activate the child theme.
 Congratulations, you have successfully installed the Intensity child theme.
In the image below, the “Intensity Child Theme” is the current “Active” theme. The Parent theme, “Intensity”, is found just to the right of the child theme image. If you are looking to modify the core code of the Intensity theme, use the Intensity Child Theme to make your modifications.

Useful Documentation On Child Themes
If you’d like to learn more about child themes, check out the links below.WordPress Codex on Child Themes
How To Create A WP Child Theme video by WPBeginner.com
Intensity | Responsive Multi-Purpose Theme – v1.2.3 (September 11, 2017)
* Added font size and hover color options for social media links in header and footer
* Added Open Graph meta tags for pages and posts
* Fixed a conflict with the preloader and the Autoptomize plugin
* Updated WooCommerce template files
Intensity | Responsive Multi-Purpose Theme – v1.2.2 (September 11, 2017)
* Updated Intense to version 2.9.0
* Updated Visual Composer to version 5.2.1
* Updated LayerSlider WP to version 6.5.8
* Updated Slider Revolution to version 5.4.5.2
* Fixed a typo in the branding settings
* Fixed compatibility issues with WooCommerce 3.0.9
Intensity | Responsive Multi-Purpose Theme – v1.2.1 (May 25, 2017)
* Fixed showing of nested categories in the breadcrumb
* Updated Intense to version 2.8.9
* Updated LayerSlider WP to version 6.5.1
* Updated Slider Revolution to version 5.4.5.1
Intensity | Responsive Multi-Purpose Theme – v1.2.0 (April 25, 2017)
* Updated Slider Revolution to version 5.4.3
Intensity | Responsive Multi-Purpose Theme – v1.1.9 (April 18, 2017)
* Updated Intense to version 2.8.8
* Updated LayerSlider WP to version 6.3.0
* Updated Slider Revolution to version 5.4.1
* Updated Visual Composer to version 5.1.1
* Fixed compatibility issues with WooCommerce 3.0+
Intensity | Responsive Multi-Purpose Theme – v1.1.8 (Feb 7, 2017)
* Updated Intense to version 2.8.7
* Updated LayerSlider WP to version 6.1.0
* Updated Slider Revolution to version 5.3.1.5
* Fixed PHP 7.1 related warnings
* Fixed an issue with the one column team template found in the agency child theme
* Fixed an issue with the two column text only content template found in the political child theme
Intensity | Responsive Multi-Purpose Theme – v1.1.7 (December 6, 2016)
* Updated Advanced Custom Fields (ACF) to the latest version (5.5.1)
* Updated Intense to version 2.8.5
* Updated LayerSlider WP to version 6.0.6
* Updated Slider Revolution to version 5.3.1
* Updated Visual Composer to version 5.0.1
Intensity | Responsive Multi-Purpose Theme – v1.1.6 (November 10, 2016)
* Fixed content section breakout issues with parallax background images
* Updated Advanced Custom Fields (ACF) to the latest version (5.4.8)
* Updated Intense to version 2.8.4
* Updated LayerSlider WP to version 6.0.5
Intensity | Responsive Multi-Purpose Theme – v1.1.5 (November 9, 2016)
* Fixed CSS link for dynamically created CSS files
* Updated LayerSlider WP to version 6.0.3
* Updated Slider Revolution to version 5.3.0.2
Intensity | Responsive Multi-Purpose Theme – v1.1.4 (October 14, 2016)
* Fixed an issue with the way preloader code handles download links
* Updated Intense to version 2.8.2
* Updated Redux Framework to the latest version (3.6.1.3)
Intensity | Responsive Multi-Purpose Theme – v1.1.3 (September 15, 2016)
* Fixed preloader so it doesn’t animate when triggered from the single attachment page or
when downloading a file
* Fixed some margin issues that caused horizontal scrollbars
* Fixed default logo url to use the website’s url if not set.
This also fixes an issue with qtranslate reverting to default language.
* Fixed a compatibility issue with upcoming WordPress version 4.7
* Updated WooCommerce templates
* Updated Intense to version 2.8.1
* Updated Visual Composer to version 4.12.1
Intensity | Responsive Multi-Purpose Theme – v1.1.2 (July 8, 2016)
* Updated LayerSlider WP to version 5.6.9
* Updated Slider Revolution to version 5.2.6
* Updated Visual Composer to version 4.12
* Updated Intense to version 2.8.0
* The above plugins were somehow not updated during packaging of version 1.1.1
Intensity | Responsive Multi-Purpose Theme – v1.1.1 (July 6, 2016)
* Added option to show/hide social links on post pages
* Added Alt Text option for the site logo image
* Added Background Color, Border, and Border Radius options for Secondary level menu
* Updated LayerSlider WP to version 5.6.9
* Updated Slider Revolution to version 5.2.6
* Updated Visual Composer to version 4.12
* Updated Intense to version 2.8.0
* Updated TGM Plugin Activation class to version 2.6.1
Intensity | Responsive Multi-Purpose Theme – v1.1.0 (May 31, 2016)
* Fixed an issue in Intense that was preventing installing of demos
* Updated Redux Framework to the latest version (3.6.0.5)
* Updated Slider Revolution to version 5.2.5.3
* Updated Intense to version 2.7.9
Intensity | Responsive Multi-Purpose Theme – v1.0.9 (May 26, 2016)
* Improved demo installation by separating out steps, improving feedback,
preventing the chance of conflicts with plugins, and adding the ability
to manually FTP upload the demo zip file to the server for installation
* Increased request timeouts for demo import
* Improved overall performance of admin screens
* Fixed issue with saving of template files created with the Templates CPT
* Updated LayerSlider WP to version 5.6.8
* Updated Slider Revolution to version 5.2.5.1
* Updated Intense to version 2.7.8
Intensity | Responsive Multi-Purpose Theme – v1.0.8 (May 3, 2016)
* Fixed broken demo import
* Removed global word-break styling
* Updated LayerSlider WP to version 5.6.6
* Improved overall performance of admin screens
Intensity | Responsive Multi-Purpose Theme – v1.0.7 (April 26, 2016)
* Updated Slider Revolution to version 5.2.5
* Updated Redux Framework to the latest version (3.6.0.1)
* Added child theme’s style.css as another way to add custom CSS
* Fixed menu styling and search button for page/post level saved header menus
* Improved overall performance
Intensity | Responsive Multi-Purpose Theme – v1.0.6 (April 13, 2016)
* Added Welcome tab to theme options to show links and plugins
* Added theme registration to receive automatic updates, support registration, forum access and more
* Added automatic updates. Users will need to manually update to version 1.0.6.
* Added new “Left menu without branding” header template
* Fixed “Branding on left with menu below” header template
Intensity | Responsive Multi-Purpose Theme – v1.0.5 (April 5, 2016)
* Fixed theme check issues
* Fixed bug in several templates when Intense isn’t enabled
* Fixed missing header animation option warning
* Removed unused intensity_after_closing_body action
* Removed Redux notices
* Removed forced activation/deactivation from TGMPA plugins
* Replaced dirname( __FILE__ ) with get_template_directory() in included plugins
Intensity | Responsive Multi-Purpose Theme – v1.0.4 (March 31, 2016)
* Moved wp_footer to just before closing body tag
* Changed site icon check from WP version to wp_site_icon function check
* Removed functions from header and footer templates
* Prefixed functions, actions, and more that weren’t prefixed
* Fixed data validation issues where dynamic data was not properly escaped
* Fixed divide-by-zero issue in multicolumn widget templates
* Replaced system calls for reading/writing files with WP_Filesystem methods
* Consolidated Intro Effect single post templates to reduce space
Intensity | Responsive Multi-Purpose Theme – v1.0.3 (March 22, 2016)
* Fixed importing of custom post types and saved templates
* Updated theme translatable strings so they are now properly escaped
* Removed use of basename() and dirname() functions
Intensity | Responsive Multi-Purpose Theme – v1.0.2 (March 14, 2016)
* Added support for full width mega menus
* Fixed main translation file changing it from .po/.mo to .pot version
* Removed SVG upload capability because it is a potential security risk
* Removed inline styles across templates and theme files
* Refactored code to remove use of global variables
* Refactored shrink header mode
* Omit closing PHP tag on some pages to avoid “Headers already sent” issues
Intensity | Responsive Multi-Purpose Theme – v1.0.1 (March 9, 2016)
* Added support for Easy Digital Downloads
* Added support for Gravity Forms
* Added support for BuddyPress
* Added ‘nogutter’ class to a couple post fullwidth templates
* Added Agency child theme
* Added Brewery child theme
* Added ability to use Template CPT to create Primary Footer and Secondary Footer templates
* Fixed circle image center alignment on one of the author templates
* Fixed a few font size issues
Intensity | Responsive Multi-Purpose Theme – v1.0.0 (February 20, 2016)
* Initial Release
Intensity requires a working version of WordPress – which can be installed in multiple ways. Check with your hosting provider to make sure you meet the minimum requirements. Often hosting providers will have tools that make installing WordPress a matter of just a few clicks. Check with your hosting company to see if this is an option available to you. If you are looking for hosting, check out our list of recommended hosting companies.
If you need help installing WordPress, there are step-by-step instructions found within the WordPress Codex.
The following video created by Woo Themes walks through the installation process.
The Intensity theme is made to work with WordPress 3.5 or newer, PHP 5.6 or newer, and MySQL 5 or newer. However, we recommend you follow the requirements listed for WordPress.
PHP Configuration
Many issues can be caused by PHP configuration settings that are too low. Issues such as: having problems uploading or installing files, experiencing a white screen when trying to access your site, mysteriously losing menu items when editing large menus, etc. can all be related to PHP configuration settings.
| Recommended Settings | |
|---|---|
| max_execution_time | 180 |
| memory_limit | 128M |
| post_max_size | 32M |
| upload_max_filesize | 32M |
If you are unsure how to change these settings yourself, your hosting company can help. You can see what your current settings are by using the following plugin: